Managing loads in the loading space
Multiple loads in the loading space
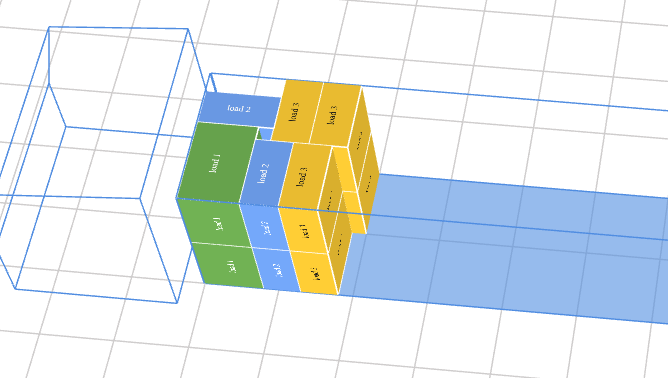
The example below shows a request for placing a variety of different loads inside the loading space.
Request:
    "loads": [
        {
           "quantity": 10,
           "name": "load 1",
           "length": 120,
           "width": 80,
           "height": 100,
           "weight": 100
        },
         {
           "quantity": 5,
           "name": "load 2",
           "length": 100,
           "width": 50,
           "height": 100,
           "weight": 500
        },
        {
           "quantity": 5,
           "name": "load 3",
           "length": 100,
           "width": 50,
           "height": 100,
           "weight": 500
        }
],
        "loadingSpaces": [
        {
            "quantity": 1,
            "name": "truck 2",
            "parts": [
                {
                    "length": 1300,
                    "width": 200,
                    "height": 200,
                    "limit": 24000
                }
            ]
        }
    ],
  "options": {
            }
}
Result
Different load types
Goodloading supports 3 load types, defined by the “loadType” parameter:
- 0 – cuboid load
- 1 – barrel
- 2 – pipe
For each of these load types, strictly defined rules govern how the load parameters supplied in the Request map to the parameters in the Response; these rules are tied to how the load is positioned in the space.
As already explained in the previous section, positioning loads within the loading space always refers to the coordinate system x, y, z, whose origin {x=0, y=0, z=0} is always located in the bottom left corner of the space, viewed from the rear.
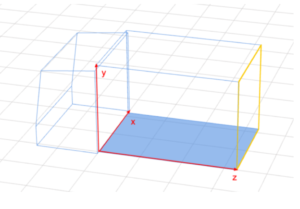
When optimizing the load plan, the algorithm may rotate loads, provided this is permitted. Load rotation is controlled by the following parameters:
- allowToRotate – default value “true” – allows loads to be rotated about their base only, which applies to cuboids and pipes
- rotateFreely – default value “false” – allows free rotation of cuboids only
For the parameters in the Response, the rule is always that the individual axes correspond to the following load parameters:
- x – “width”,
- y – “height”,
- z – “length”,
In the Response, these parameter types apply to every load type, because even for pipes and barrels the algorithm always converts their input parameters into “width”, “height” and “length” as output parameters.
The following subsections provide detailed descriptions of all load types.
Cuboid load
Load type “loadType”: 0.
A cuboid load is defined in the Request by 3 spatial parameters:
- “width”,
- “height”,
- “length”
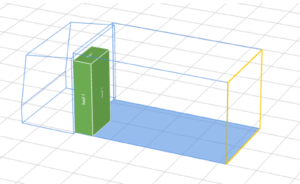
Based on these parameters, the algorithm assigns the load its output parameters in the Response, following its own load-arranging rules – for example, that when loading from the rear, loads start from the bottom left corner next to the driver’s cab and the algorithm tries to fill the rows one after another, starting at the cab. In doing so, it takes into account the values of the parameters that permit load rotation. In the example below, in the Response the algorithm swapped “width” and “length”. It was allowed to do so because it had the default permission to rotate the load about its base.
In the example below, the space-related parameters have been highlighted in both the Request and the Response.
Request
{
  "loads": [
        {
           "quantity": 1,
           "name": "load 1",
           "length": 100,
           "width": 50,
           "height": 200,
           "weight": 500,
           "loadType": 0
        }
],
   "loadingSpaces": [
        {
           "quantity": 1,
            "name": "Bus 8 EP",
            "parts": [
                {
                    "length": 420,
                    "width": 220,
                    "height": 220,
                    "limit": 1500
                }
            ]
        }
    ],
  "options": {
            }
}
Response
{
    "loadingSpaces": [
        {
            "id": 1,
            "name": "Bus 8 EP",
            "parts": [
                {
                    "height": 220,
                    "length": 420,
                    "width": 220,
                    "limit": 1500,
                    "loads": [
                        {
                            "id": 1,
                            "allowToRotate": true,
                            "stacking": true,
                            "name": "load 1",
                            "loadType": 0,
                            "priority": 0,
                            "quantity": 1,
                            "width": 100,
                            "length": 50,
                            "height": 200,
                            "weight": 500,
                            "diameter": 0,
                            "origin": null,
                            "destination": null,
                            "pctSupport": 100,
                            "alongFloor": false,
                            "boxesBelowAllowed": [],
                            "color": 6989903,
                            "placement": [
                                {
                                    "height": 200,
                                    "length": 50,
                                    "width": 100,
                                    "diameter": 0,
                                    "loadsPerAxis": {
                                        "x": 1,
                                        "y": 1,
                                        "z": 1
                                    },
                                    "position": {
                                        "x": 0,
                                        "y": 0,
                                        "z": 0
                                    },
                                    "cubeId": 0
                                }
                            ]
                        }
                    ],
                    "loadingSide": "back",
                    "summary": {
                        "freeLdm": 370,
                        "occupiedLdm": 50,
                        "freeSurface": 8740000,
                        "occupiedSurface": 500000,
                        "freeVolume": 193280000000,
                        "occupiedVolume": 10000000000,
                        "percentLdmUsd": 11.904761904761903,
                        "percentVolumeUsd": 4.919323101141283,
                        "totalLoadsWeight": 500
                    },
                    "axis": []
                }
            ],
            "type": "vehicle"
        }
    ],
    "notFittedLoads": [],
    "options": {
        "allowOverweight": false,
        "unit": "cm",
        "keepLoadsTogether": false,
        "newAlgorithm": true,
        "arrangeOptimally": false,
        "loadingOrder": "default",
        "keepGroupsInGivenSpaces": false,
        "isMagnetOn": false,
        "multiStops": false,
        "includeSavedLoadingSpaces": false,
        "additionOrder": true,
        "userOrder": false,
        "volumeOrder": false,
        "weightOrder": false
    },
    "_links": [
        {
            "rel": "preview",
            "href": "https://goodloading-app.service.aws-eu-west-1.sdp.rc.goodloading.com/session?id=afeb3044-6b6a-41a7-83b3-999a45c299f8&pref=opt-names-opened"
        }
    ]
}
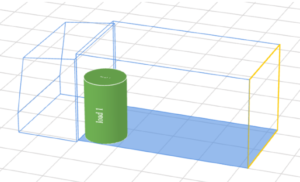
Barrel
Load type “loadType”: 1
A barrel is defined in the Request by 2 spatial parameters:
- “diameter”
- “height”
Based on these parameters, the algorithm assigns the load its output parameters in the Response, converting them into:
- “width”,
- “height”,
- “length”
“width” and “length” represent the square bounding area enclosing the round base of the barrel.
Barrels are always placed upright only and are not subject to any rotation.
In the example below, in the Response the algorithm assigned both “width” and “length” the same value taken from “diameter”.
The space-related parameters have been highlighted in both the Request and the Response.
Request
{
  "loads": [
        {
           "quantity": 1,
           "name": "load 1",
           "height": 150,
           "diameter": 100,
           "weight": 50,
           "loadType": 1
        }
],
   "loadingSpaces": [
        {
           "quantity": 1,
            "name": "Bus 8 EP",
            "parts": [
                {
                    "length": 420,
                    "width": 220,
                    "height": 220,
                    "limit": 1500
                }
            ]
        }
    ],
  "options": {
            }
}
Response
{
    "loadingSpaces": [
        {
            "id": 1,
            "name": "Bus 8 EP",
            "parts": [
                {
                    "height": 220,
                    "length": 420,
                    "width": 220,
                    "limit": 1500,
                    "loads": [
                        {
                            "id": 1,
                            "allowToRotate": true,
                            "stacking": true,
                            "name": "load 1",
                            "loadType": 1,
                            "priority": 0,
                            "quantity": 1,
                            "width": 100,
                            "length": 100,
                            "height": 150,
                            "weight": 50,
                            "diameter": 100,
                            "origin": null,
                            "destination": null,
                            "pctSupport": 100,
                            "alongFloor": false,
                            "boxesBelowAllowed": [],
                            "color": 6989903,
                            "placement": [
                                {
                                    "height": 150,
                                    "length": 100,
                                    "width": 100,
                                    "diameter": 100,
                                    "loadsPerAxis": {
                                        "x": 1,
                                        "y": 1,
                                        "z": 1
                                    },
                                    "position": {
                                        "x": 0,
                                        "y": 0,
                                        "z": 0
                                    },
                                    "cubeId": 0
                                }
                            ]
                        }
                    ],
                    "loadingSide": "back",
                    "summary": {
                        "freeLdm": 320,
                        "occupiedLdm": 100,
                        "freeSurface": 8240000,
                        "occupiedSurface": 1000000,
                        "freeVolume": 188280000000,
                        "occupiedVolume": 15000000000,
                        "percentLdmUsd": 23.809523809523807,
                        "percentVolumeUsd": 7.378984651711924,
                        "totalLoadsWeight": 50
                    },
                    "axis": []
                }
            ],
            "type": "vehicle"
        }
    ],
    "notFittedLoads": [],
    "options": {
        "allowOverweight": false,
        "unit": "cm",
        "keepLoadsTogether": false,
        "newAlgorithm": true,
        "arrangeOptimally": false,
        "loadingOrder": "default",
        "keepGroupsInGivenSpaces": false,
        "isMagnetOn": false,
        "multiStops": false,
        "includeSavedLoadingSpaces": false,
        "additionOrder": true,
        "userOrder": false,
        "volumeOrder": false,
        "weightOrder": false
    },
    "_links": [
        {
            "rel": "preview",
            "href": "https://goodloading-app.service.aws-eu-west-1.sdp.rc.goodloading.com/session?id=9af9b644-027f-422e-9041-04cedc518b44&pref=opt-names-opened"
        }
    ]
}
Pipe
Load type “loadType”: 2
A pipe is defined in the Request by 2 spatial parameters:
- “diameter”
- “length”
Based on these parameters, the algorithm assigns the load its output parameters in the Response, converting them into:
- “width”,
- “height”,
- “length”
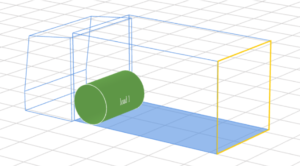
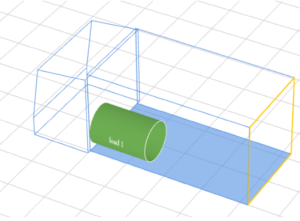
Pipes cannot be stood upright; they can only be laid along the length or the width of the loading space. In the Response, whether a pipe is laid along the vehicle’s width or its length is distinguished by the values of the “width” and “length” parameters. The “height” parameter – always takes the value matching “diameter”.
Pipe orientation:
- along the width of the space – “length” = 0, “width” >0
- along the length of the space – “length” >0, “width” = 0
In the examples below, the space-related parameters have been highlighted in both the Request and the Response.
Example 1
Pipe laid along the width of the vehicle
Request
 {
  "loads": [
        {
           "quantity": 1,
           "name": "load 1",
           "length": 150,
           "diameter": 100,
           "weight": 100,
           "loadType": 2
        }

],
        "loadingSpaces": [
        {
           "quantity": 1,
            "name": "Bus 8 EP",
            "parts": [
                {
                    "length": 420,
                    "width": 220,
                    "height": 220,
                    "limit": 1500
                }
            ]
        }
    ],
  "options": {
            }
}
Response
{
    "loadingSpaces": [
        {
            "id": 1,
            "name": "Bus 8 EP",
            "parts": [
                {
                    "height": 220,
                    "length": 420,
                    "width": 220,
                    "limit": 1500,
                    "loads": [
                        {
                            "id": 1,
                            "allowToRotate": true,
                            "stacking": true,
                            "name": "load 1",
                            "loadType": 2,
                            "priority": 0,
                            "quantity": 1,
                            "width": 150,
                            "length": 0,
                            "height": 100,
                            "weight": 100,
                            "diameter": 100,
                            "origin": null,
                            "destination": null,
                            "pctSupport": 100,
                            "alongFloor": false,
                            "boxesBelowAllowed": [],
                            "color": 6989903,
                            "placement": [
                                {
                                    "height": 100,
                                    "length": 0,
                                    "width": 150,
                                    "diameter": 100,
                                    "loadsPerAxis": {
                                        "x": 1,
                                        "y": 1,
                                        "z": 1
                                    },
                                    "position": {
                                        "x": 0,
                                        "y": 0,
                                        "z": 0
                                    },
                                    "cubeId": 0
                                }
                            ]
                        }
                    ],
                    "loadingSide": "back",
                    "summary": {
                        "freeLdm": 320,
                        "occupiedLdm": 100,
                        "freeSurface": 9240000,
                        "occupiedSurface": 0,
                        "freeVolume": 203280000000,
                        "occupiedVolume": 0,
                        "percentLdmUsd": 23.809523809523807,
                        "percentVolumeUsd": 0,
                        "totalLoadsWeight": 100
                    },
                    "axis": []
                }
            ],
            "type": "vehicle"
        }
    ],
    "notFittedLoads": [],
    "options": {
        "allowOverweight": false,
        "unit": "cm",
        "keepLoadsTogether": false,
        "newAlgorithm": true,
        "arrangeOptimally": false,
        "loadingOrder": "default",
        "keepGroupsInGivenSpaces": false,
        "isMagnetOn": false,
        "multiStops": false,
        "includeSavedLoadingSpaces": false,
        "additionOrder": true,
        "userOrder": false,
        "volumeOrder": false,
        "weightOrder": false
    },
    "_links": [
        {
            "rel": "preview",
            "href": "https://goodloading-app.service.aws-eu-west-1.sdp.rc.goodloading.com/session?id=fe4ad9b3-2904-4986-9524-f3363a24959f&pref=opt-names-opened"
        }
    ]
}
Example 2
Pipe laid along the length of the vehicle
Request
 {
  "loads": [
        {
           "quantity": 1,
           "name": "load 1",
           "length": 150,
           "diameter": 100,
           "weight": 100,
           "loadType": 2,
           "allowToRotate": false
        }
],
        "loadingSpaces": [
        {
           "quantity": 1,
            "name": "Bus 8 EP",
            "parts": [
                {
                    "length": 420,
                    "width": 220,
                    "height": 220,
                    "limit": 1500
                }
            ]
        }
    ],
  "options": {
            }
}
Response
{
    "loadingSpaces": [
        {
            "id": 1,
            "name": "Bus 8 EP",
            "parts": [
                {
                    "height": 220,
                    "length": 420,
                    "width": 220,
                    "limit": 1500,
                    "loads": [
                        {
                            "id": 1,
                            "allowToRotate": false,
                            "stacking": true,
                            "name": "load 1",
                            "loadType": 2,
                            "priority": 0,
                            "quantity": 1,
                            "width": 0,
                            "length": 150,
                            "height": 100,
                            "weight": 100,
                            "diameter": 100,
                            "origin": null,
                            "destination": null,
                            "pctSupport": 100,
                            "alongFloor": false,
                            "boxesBelowAllowed": [],
                            "color": 6989903,
                            "placement": [
                                {
                                    "height": 100,
                                    "length": 150,
                                    "width": 0,
                                    "diameter": 100,
                                    "loadsPerAxis": {
                                        "x": 1,
                                        "y": 1,
                                        "z": 1
                                    },
                                    "position": {
                                        "x": 0,
                                        "y": 0,
                                        "z": 0
                                    },
                                    "cubeId": 0
                                }
                            ]
                        }
                    ],
                    "loadingSide": "back",
                    "summary": {
                        "freeLdm": 270,
                        "occupiedLdm": 150,
                        "freeSurface": 9240000,
                        "occupiedSurface": 0,
                        "freeVolume": 203280000000,
                        "occupiedVolume": 0,
                        "percentLdmUsd": 35.714285714285715,
                        "percentVolumeUsd": 0,
                        "totalLoadsWeight": 100
                    },
                    "axis": []
                }
            ],
            "type": "vehicle"
        }
    ],
    "notFittedLoads": [],
    "options": {
        "allowOverweight": false,
        "unit": "cm",
        "keepLoadsTogether": false,
        "newAlgorithm": true,
        "arrangeOptimally": false,
        "loadingOrder": "default",
        "keepGroupsInGivenSpaces": false,
        "isMagnetOn": false,
        "multiStops": false,
        "includeSavedLoadingSpaces": false,
        "additionOrder": true,
        "userOrder": false,
        "volumeOrder": false,
        "weightOrder": false
    },
    "_links": [
        {
            "rel": "preview",
            "href": "https://goodloading-app.service.aws-eu-west-1.sdp.rc.goodloading.com/session?id=250eefbf-9d90-4545-9d14-76898b1ff3b0&pref=opt-names-opened"
        }
    ]
}
Order in which loads are arranged in the loading space
Default order – by the order in which loads are defined
Arranging loads in the selected loading space according to the order in which they are defined.
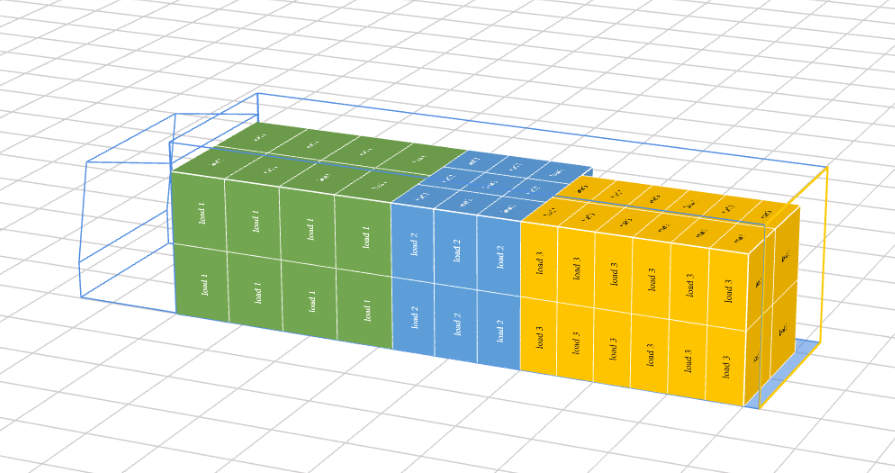
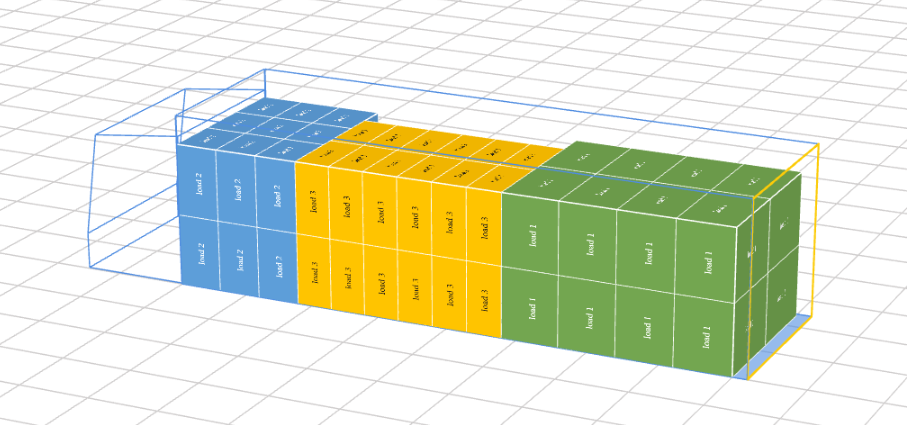
In Example 1 and Example 2, the same loads are defined, differing only in the order of definition. Changing the order in which loads are defined in the Request also changes how they are arranged in the visualization – Example 2.
Example 1
The loads were defined in the following order: “load 1”, “load 2”, “load 3”, and a visualization of how they are arranged is shown.
Request
{
 "loads": [
        {
           "quantity": 16,
           "name": "load 1",
           "color": "#71A34E",
           "length": 120,
           "width": 80,
           "height": 100,
           "weight": 50

        },
         {
           "quantity": 18,
           "name": "load 2",
           "color": "#5B9BD5",
           "length": 80,
           "width": 60,
           "height": 100,
           "weight": 200
        },
        {
           "quantity": 24,
           "name": "load 3",
           "color": "#FFC000",
           "length": 100,
           "width": 50,
           "height": 100,
           "weight": 150
        }
],
        "loadingSpaces": [
        {
            "quantity": 1,
            "name": "Solowka 20 EP",
            "parts": [
                {
                    "length": 820,
                    "width": 245,
                    "height": 240,
                    "limit": 8000
                }
            ]
        }
    ],
     "options": {
                }
}
Result
Example 2
The order in which the loads are defined has been changed relative to Example 1. In Example 2 the loads were defined in the order: “load 2”, “load 3”, “load 1”.
The visualization in Example 2 shows how the arrangement of the loads changed compared to the visualization in Example 1.
Request
{
 "loads": [
        {
           "quantity": 18,
           "name": "load 2",
           "color": "#5B9BD5",
           "length": 80,
           "width": 60,
           "height": 100,
           "weight": 200

        },
        {
          "quantity": 24,
           "name": "load 3",
           "color": "#FFC000",
           "length": 100,
           "width": 50,
           "height": 100,
           "weight": 150
        },
         {
           "quantity": 16,
           "name": "load 1",
            "color": "#71A34E",
           "length": 120,
           "width": 80,
           "height": 100,
           "weight": 50
        }
],
       "loadingSpaces": [
        {
            "quantity": 1,
            "name": "Solowka 20 EP",
            "parts": [
                {
                    "length": 820,
                    "width": 245,
                    "height": 240,
                    "limit": 8000
                }
            ]
        }
    ],
     "options": {
                }
}
Result
Order by load weight
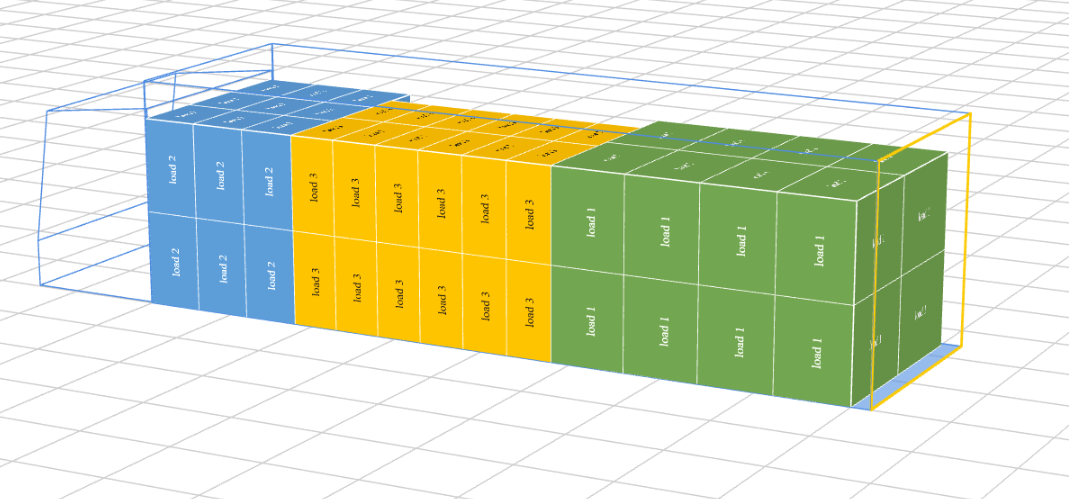
Enabling this option means that the heaviest loads are arranged first.
 "options": {
        "loadingOrder": "weight"
                }
Example
Request
{
"loads": [
        {
           "quantity": 16,
           "name": "load 1",
           "color": "#71A34E",
           "length": 120,
           "width": 80,
           "height": 100,
           "weight": 50

        },
         {
           "quantity": 18,
           "name": "load 2",
           "color": "#5B9BD5",
           "length": 80,
           "width": 60,
           "height": 100,
           "weight": 200
        },
        {
           "quantity": 24,
           "name": "load 3",
           "color": "#FFC000",
           "length": 100,
           "width": 50,
           "height": 100,
           "weight": 150
        }
],
        "loadingSpaces": [
        {
           "quantity": 1,
            "name": "Solowka 20 EP",
            "parts": [
                {
                    "length": 820,
                    "width": 245,
                    "height": 240,
                    "limit": 8000
                }
            ]
        }
    ],
     "options": {
        "loadingOrder": "weight"
                }
}
Result
Order by load volume
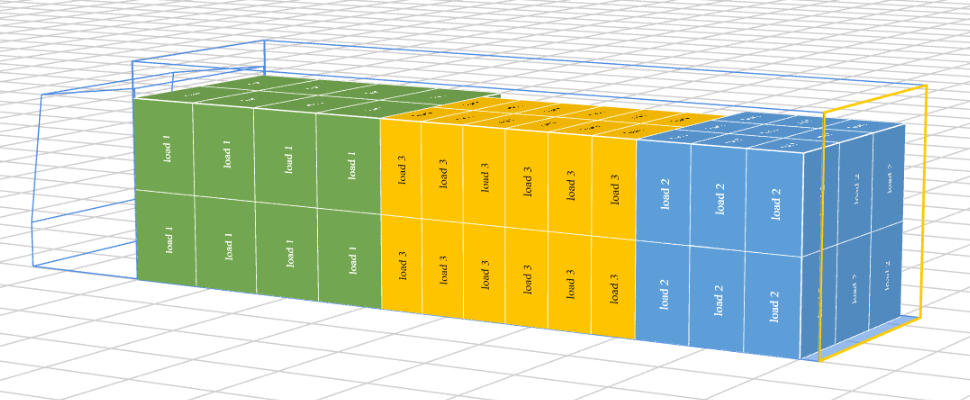
Enabling this option means that the largest-volume loads are arranged first.
 "options": {
        "loadingOrder": "volume"
                }
Example
Request
{
 "loads": [
        {
           "quantity": 16,
           "name": "load 1",
           "color": "#71A34E",
           "length": 120,
           "width": 80,
           "height": 100,
           "weight": 50
        },
         {
           "quantity": 18,
           "name": "load 2",
           "color": "#5B9BD5",
           "length": 80,
           "width": 60,
           "height": 100,
           "weight": 200
        },
        {
           "quantity": 24,
           "name": "load 3",
           "color": "#FFC000",
           "length": 100,
           "width": 50,
           "height": 100,
           "weight": 150
        }
],
        "loadingSpaces": [
        {
           "quantity": 1,
            "name": "Solowka 20 EP",
            "parts": [
                {
                    "length": 820,
                    "width": 245,
                    "height": 240,
                    "limit": 8000
                }
            ]
        }
    ],
     "options": {
        "loadingOrder": "volume"
                }
}
Result
Order by load priority
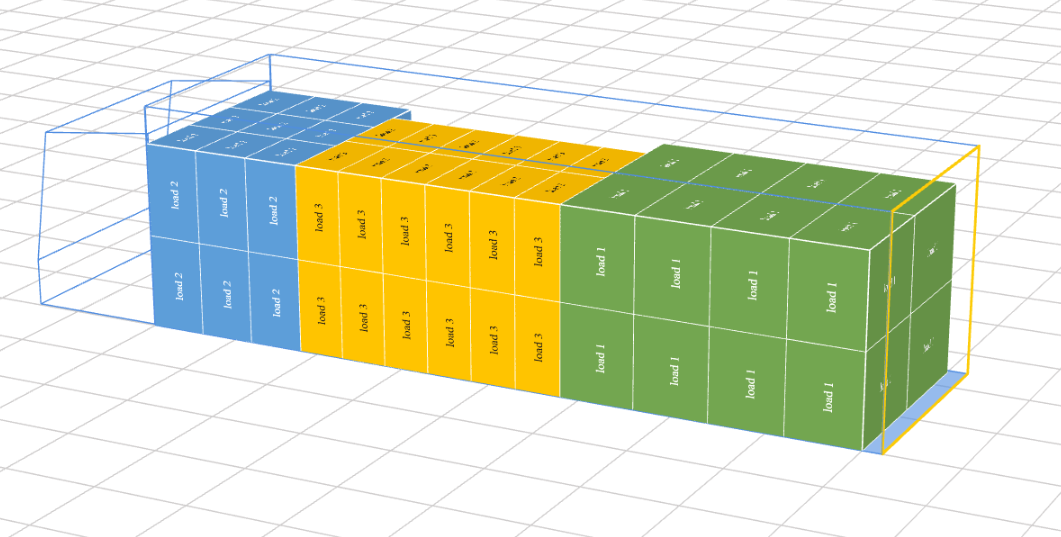
We can control how loads are arranged in the loading space by assigning them priorities:
- each load must be assigned a “priority” – it takes numeric values 1..n, where 1 means the highest priority,
- in the options, set:
"options": {
        "loadingOrder": "priority"
                }
Example
Request
{
 "loads": [
        {
           "quantity": 16,
           "name": "load 1",
           "color": "#71A34E",
           "length": 120,
           "width": 80,
           "height": 100,
           "weight": 50,
           "priority": 3

        },
         {
           "quantity": 18,
           "name": "load 2",
           "color": "#5B9BD5",
           "length": 80,
           "width": 60,
           "height": 100,
           "weight": 200,
           "priority": 1
        },
        {
           "quantity": 24,
           "name": "load 3",
           "color": "#FFC000",
           "length": 100,
           "width": 50,
           "height": 100,
           "weight": 150,
           "priority": 2
        }
],
        "loadingSpaces": [
        {
           "quantity": 1,
            "name": "Solowka 20 EP",
            "parts": [
                {
                    "length": 820,
                    "width": 245,
                    "height": 240,
                    "limit": 8000
                }
            ]
        }
    ],
     "options": {
        "loadingOrder": "priority"
                }
}
Result
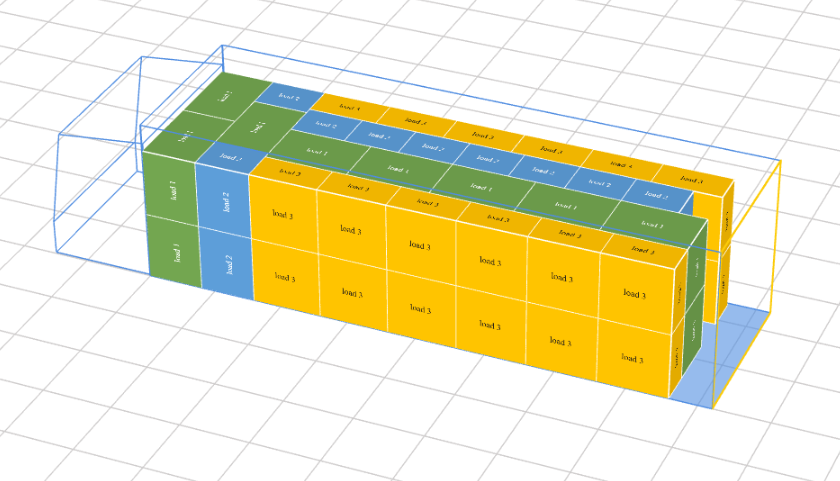
Optimal arrangement
Enabling the “arrange optimally” option makes the algorithm search for an arrangement that leaves as much free space as possible, regardless of the order in which loads were added or the other parameters mentioned earlier.
 "options": {
        "arrangeOptimally": true
                }
Example
Optimization within 1 loading space
Request
{
 "loads": [
        {
           "quantity": 16,
           "name": "load 1",
           "color": "#71A34E",
           "length": 120,
           "width": 80,
           "height": 100,
           "weight": 50
        },
         {
           "quantity": 18,
           "name": "load 2",
           "color": "#5B9BD5",
           "length": 80,
           "width": 60,
           "height": 100,
           "weight": 200
        },
        {
           "quantity": 24,
           "name": "load 3",
           "color": "#FFC000",
           "length": 100,
           "width": 50,
           "height": 100,
           "weight": 150
        }
],
        "loadingSpaces": [
        {
           "quantity": 1,
            "name": "Solowka 20 EP",
            "parts": [
                {
                    "length": 820,
                    "width": 245,
                    "height": 240,
                    "limit": 8000
                }
            ]
        }
    ],
     "options": {
        "arrangeOptimally": true
                }
}
Result
Optimal arrangement across multiple loading spaces
Provides optimization across all the loads and loading spaces that have been added.
Example 1 – without optimization (for comparison)
Arranging multiple loads across multiple loading spaces, in the order the loads were added, without optimization.
 "options": {
        "arrangeOptimally": false
                }
Request
{
 "loads": [
        {
           "quantity": 16,
           "name": "load 1",
           "color": "#71A34E",
           "length": 120,
           "width": 80,
           "height": 100,
           "weight": 50

        },
         {
           "quantity": 16,
           "name": "load 2",
           "color": "#5B9BD5",
           "length": 80,
           "width": 60,
           "height": 100,
           "weight": 60
        },
        {
           "quantity": 24,
           "name": "load 3",
           "color": "#FFC000",
           "length": 100,
           "width": 50,
           "height": 100,
           "weight": 30
        }
],
        "loadingSpaces": [
        {
           "quantity": 2,
            "name": "Bus 8 EP",
            "parts": [
                {
                    "length": 420,
                    "width": 220,
                    "height": 220,
                    "limit": 1500
                }
            ]
        }
    ],
     "options": {
        "arrangeOptimally": false
                }
}
Result
Bus 8 EP – no. 1
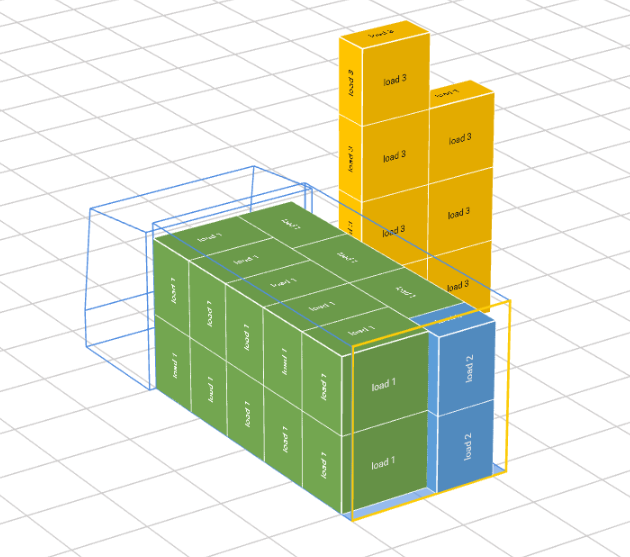
Bus 8 EP – no. 2
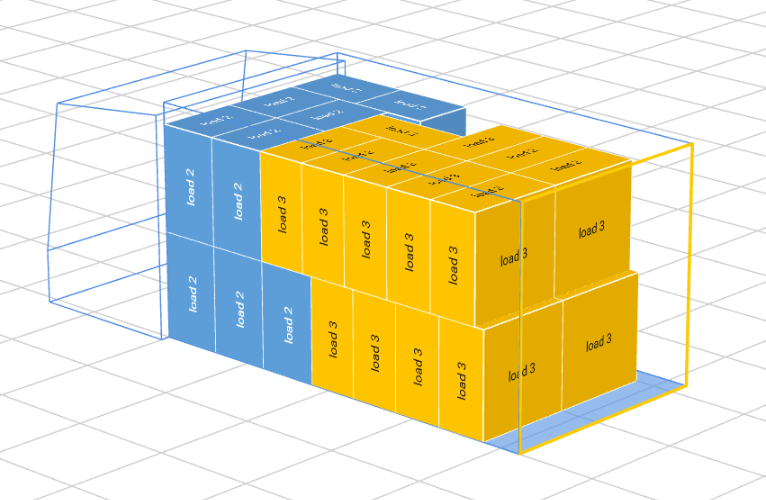
Example 2 – with optimization enabled
Arranging multiple loads across multiple loading spaces (the same loads and
spaces as in Example 1) – optimal arrangement.
"options": {
        "arrangeOptimally": true
                }
Request
{
 "loads": [
        {
           "quantity": 16,
           "name": "load 1",
           "color": "#71A34E",
           "length": 120,
           "width": 80,
           "height": 100,
           "weight": 50
        },
         {
           "quantity": 16,
           "name": "load 2",
           "color": "#5B9BD5",
           "length": 80,
           "width": 60,
           "height": 100,
           "weight": 60
        },
        {
           "quantity": 24,
           "name": "load 3",
           "color": "#FFC000",
           "length": 100,
           "width": 50,
           "height": 100,
           "weight": 30
        }
],
        "loadingSpaces": [
        {
           "quantity": 2,
            "name": "Bus 8 EP",
            "parts": [
                {
                    "length": 420,
                    "width": 220,
                    "height": 220,
                    "limit": 1500
                }
            ]
        }
    ],
     "options": {
        "arrangeOptimally": true
                }
}
Result
Bus 8 EP – no. 1
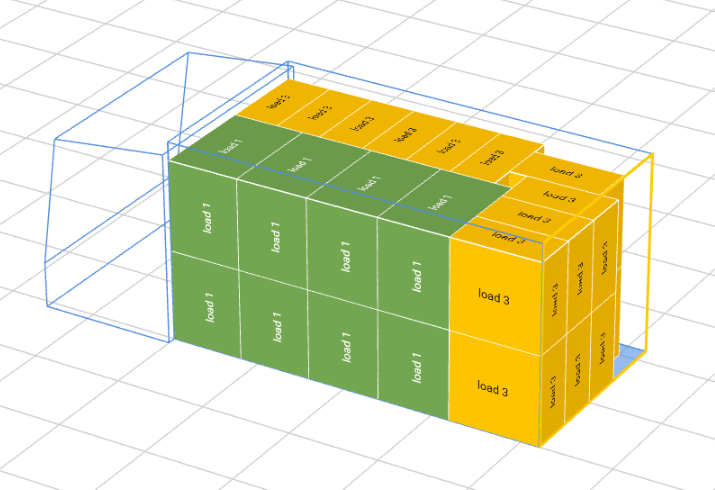
Bus 8 EP – no. 2
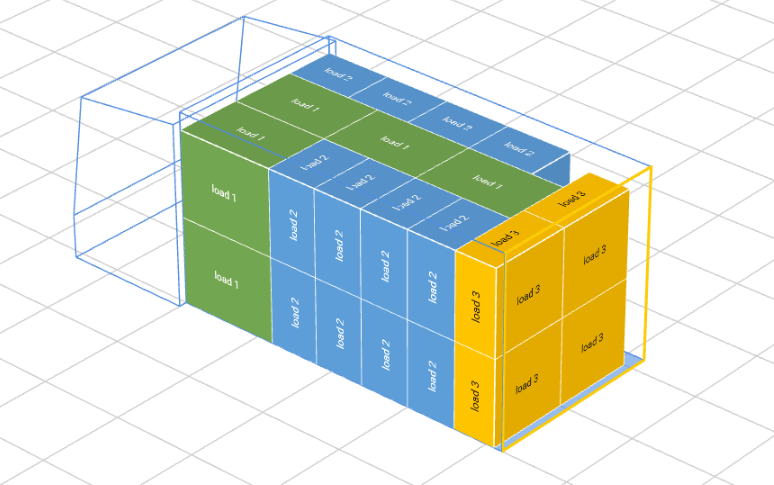
Example 3 – optimal arrangement with load prioritization
Arranging multiple loads across multiple loading spaces (the same loads and
spaces as in Examples 1 and 2) – optimal arrangement with load prioritization
"options": {
        "loadingOrder": "priority",
        "arrangeOptimally": true
                }
Request
{
 "loads": [
        {
           "quantity": 16,
           "name": "load 1",
           "color": "#71A34E",
           "length": 120,
           "width": 80,
           "height": 100,
           "weight": 50,
           "priority": 3

        },
         {
           "quantity": 16,
           "name": "load 2",
           "color": "#5B9BD5",
           "length": 80,
           "width": 60,
           "height": 100,
           "weight": 60,
           "priority": 1
        },
        {
           "quantity": 24,
           "name": "load 3",
           "color": "#FFC000",
           "length": 100,
           "width": 50,
           "height": 100,
           "weight": 30,
           "priority": 2
        }
],
        "loadingSpaces": [
        {
           "quantity": 2,
            "name": "Bus 8 EP",
            "parts": [
                {
                    "length": 420,
                    "width": 220,
                    "height": 220,
                    "limit": 1500
                }
            ]
        }
    ],
     "options": {
        "loadingOrder": "priority",
        "arrangeOptimally": true
                }
}
Result
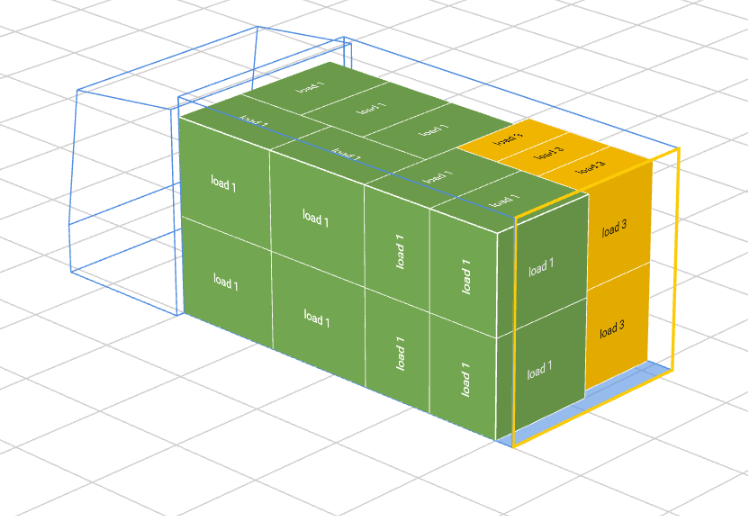
Bus 8 EP – no. 1
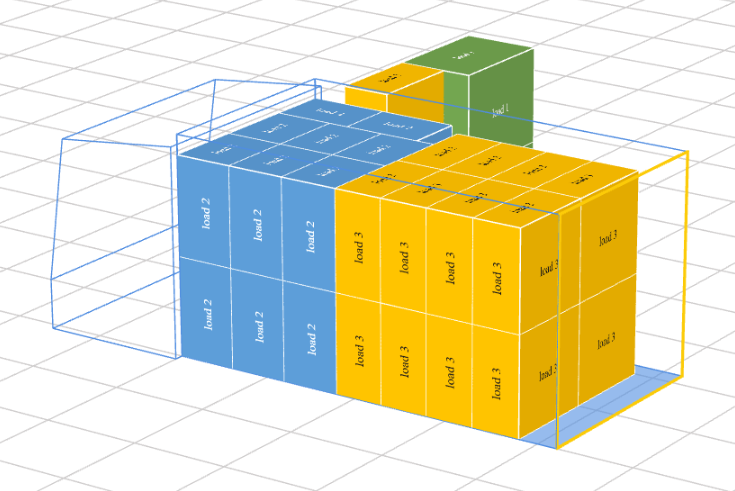
Bus 8 EP – no. 2
Barriers
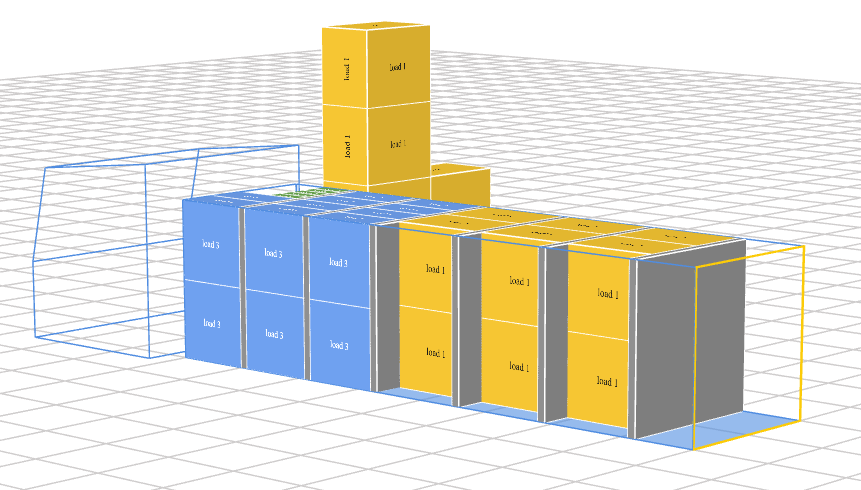
The barrier-setting feature lets you arrange loads by order and separate them with barriers.
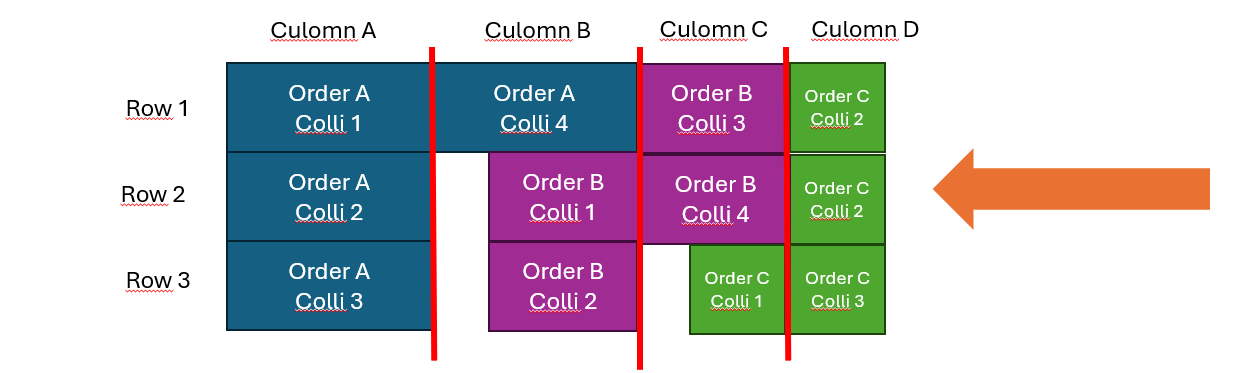
Rules for arranging loads separated by barriers:
- loads start being arranged from the vehicle cab, on the passenger side – the opposite of the other algorithms in the application;
- loads are not rotated, meaning that they are arranged with the load’s length running along the length of the vehicle (the load’s length parallel to the vehicle’s length);
- once an entire column (across the full width of the vehicle) is filled, the column is separated with a barrier and arranging the next column begins;
- loads are pushed to the right, i.e. toward the first barrier, not toward the vehicle cab;
- barriers do not fully separate individual orders, i.e. a single column may contain different orders;
- however, loads do not mix in such a way that a load from order number 1, separated by order number 2, also ends up within order number 3.
Mandatory settings for requests involving loads separated by barriers:
- ”order” – every load must have its own order identifier
- “barrier” – must be defined in the loading space:
- “thickness” – the thickness of the barrier
- “height” – the height of the barrier
- “loadingOrder”: “barrier” – the algorithm option for arranging by orders separated with barriers
Example 1
 "loads": [
        {
           "quantity": 20,
           "name": "load 2",
           "length": 50,
           "width": 20,
           "height": 50,
           "weight": 400,
           "priority": 3,
           "order": 1
        },
        {
           "quantity": 20,
           "name": "load 3",
           "length": 100,
           "width": 50,
           "height": 100,
           "weight": 500,
           "priority": 1,
           "order": 2
        },
         {
           "quantity": 18,
           "name": "load 1",
           "length": 120,
           "width": 80,
           "height": 100,
           "weight": 100,
           "priority": 2,
           "order": 3
        }
],
        "loadingSpaces": [
        {
            "quantity": 1,
            "name": "truck 2",
            "parts": [
                {
                    "length": 800,
                    "width": 200,
                    "height": 200,
                    "limit": 24000,
                    "barrier":
                        {"thickness": 10,
                         "height":200 }
                }
            ]
        }
    ],
     "options": {
        "loadingOrder": "barrier"
                }
}
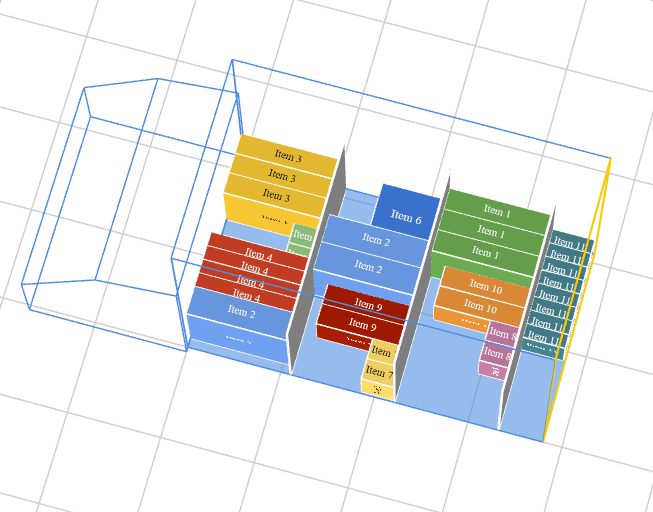
Example 2
Request
{
 "loadingSpaces": [
   {
     "quantity": 1,
     "name": "TEST LS",
     "type": "vehicle",
     "parts": [
       {
         "length": 380,
         "width": 210,
         "height": 310,
         "limit": 800,
         "barrier":
         {  "thickness": 1, "height": 150
         }
       }
     ],
     "stops": []
   }
 ],
 "loads": [
{
            "id": 1,
            "quantity": 3,
            "name": "Item 1",
            "length": 110,
            "width": 23,
            "height": 90,
            "weight": 10,
            "order": 3,
            "stacking": false,
            "rotateFreely": false
        },
        {
            "id": 10,
            "quantity": 3,
            "name": "Item 2",
            "length": 110,
            "width": 30,
            "height": 90,
            "weight": 10,
            "order": 2,
            "stacking": false,
            "rotateFreely": false
        },
        {
            "id": 11,
            "quantity": 3,
            "name": "Item 3",
            "length": 110,
            "width": 22,
            "height": 90,
            "weight": 10,
            "order": 1,
            "stacking": false,
            "rotateFreely": false
        },
        {
            "id": 12,
            "quantity": 4,
            "name": "Item 4",
            "length": 110,
            "width": 15,
            "height": 90,
            "weight": 10,
            "order": 1,
            "stacking": false,
            "rotateFreely": false
        },
        {
            "id": 2,
            "quantity": 2,
            "name": "Item 5",
            "length": 35,
            "width": 22,
            "height": 50,
            "weight": 10,
            "order": 1,
            "stacking": false,
            "rotateFreely": false
        },
        {
            "id": 3,
            "quantity": 1,
            "name": "Item 6",
            "length": 70,
            "width": 60,
            "height": 50,
            "weight": 10,
            "order": 2,
            "stacking": false,
            "rotateFreely": false
        },
        {
            "id": 4,
            "quantity": 2,
            "name": "Item 7",
            "length": 35,
            "width": 22,
            "height": 50,
            "weight": 10,
            "order": 2,
            "stacking": false,
            "rotateFreely": false
        },
        {
            "id": 5,
            "quantity": 2,
            "name": "Item 8",
            "length": 35,
            "width": 22,
            "height": 50,
            "weight": 10,
            "order": 3,
            "stacking": false,
            "rotateFreely": false
        },
        {
            "id": 6,
            "quantity": 2,
            "name": "Item 9",
            "length": 95,
            "width": 22,
            "height": 50,
            "weight": 10,
            "order": 2,
            "stacking": false,
            "rotateFreely": false
        },
        {
            "id": 7,
            "quantity": 2,
            "name": "Item 10",
            "length": 95,
            "width": 22,
            "height": 50,
            "weight": 10,
            "order": 3,
            "stacking": false,
            "rotateFreely": false
        },
        {
            "id": 20,
            "quantity": 8,
            "name": "Item 11",
            "length": 45,
            "width": 15,
            "height": 45,
            "weight": 100,
            "order": 4,
            "stacking": false,
            "rotateFreely": false
        }
 ],
"options": {
        "allowOverweight": false,
        "unit": "cm",
        "keepLoadsTogether": false,
        "newAlgorithm": true,
        "multiStops": false,
        "loadingOrder": "barrier",
        "includeSavedLoadingSpaces": false,
        "arrangeOptimally": true
    }
}
Result
Stacking
Stacking rules
The algorithm allows loads to be stacked within the loading space. The parameters that let the user specify preferred stacking rules are described below. If arranging by priority is not set in the algorithm options, loads are arranged in the order in which they appear in the request.
1. Stacking
for a load, this must be set to true (the default value) for that load to be stackable, i.e. so that other loads can be placed on top of the load for which the parameter is set. Unless other parameters state otherwise, any type of load that fits within the given loading space may be placed on top of a given load, and arranging always begins from the driver’s cab.
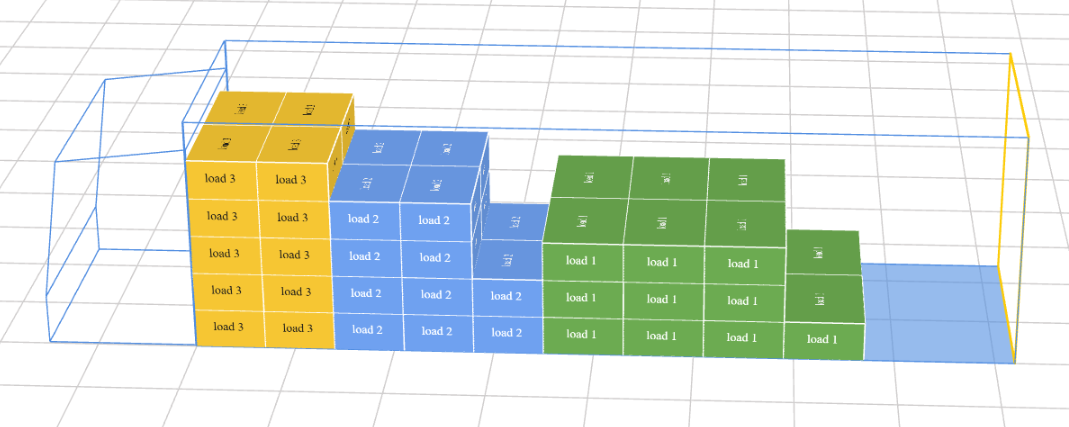
This parameter can also take numeric values, e.g. 3. A numeric value indicates that stacking is allowed and how many tiers of loads may be placed on the given load. The value given represents the total number of tiers permitted for the given load, including the bottom layer. By “a given load” we mean, for example, 4 tiers for a group of the same load. Tiers will not stack up to the specified number of different loads.
Examples:
- “Stacking”: true for all loads
- “Stacking”: false for all loads
- “Stacking”: “true” and “false”
- Number of tiers for a given load
2. alongFloor – arranging along the floor:
- setting this parameter to true means that, during stacking, loads are first arranged along the floor and only then stacked
- setting it to false (the default value) means they are stacked right away at the driver’s cab.
Examples
- Small number of loads – cuboid loads
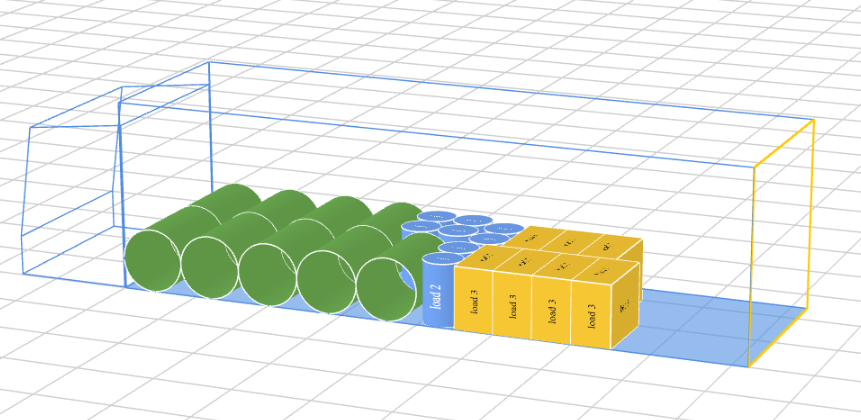
- Small number of loads – all load types
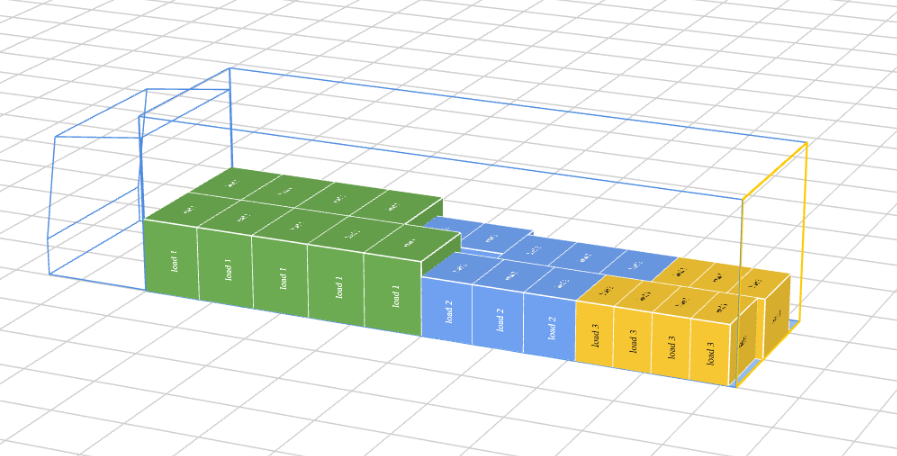
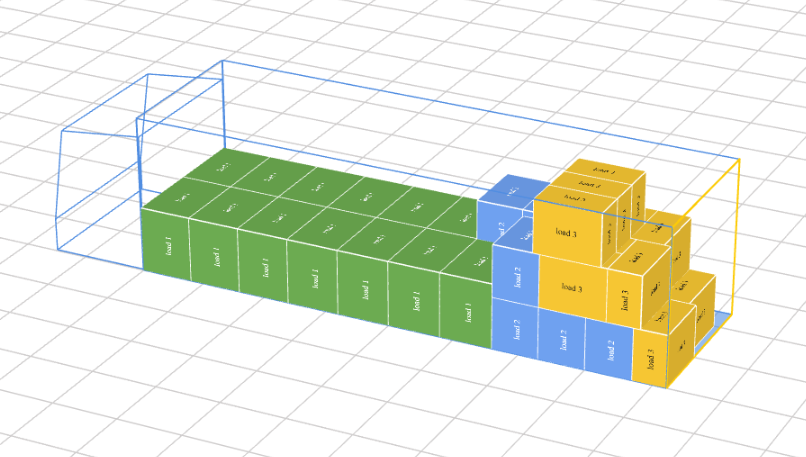
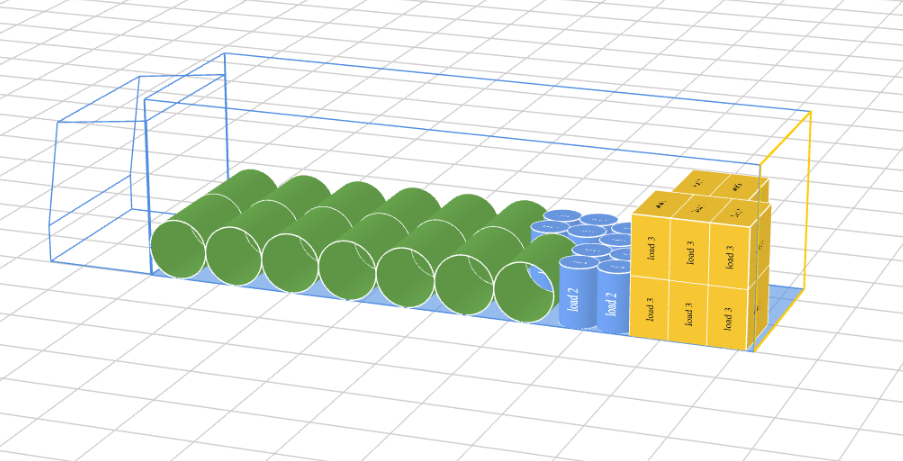
- Many loads using all available floor space – cuboid loads – with the algorithm’s default settings, loads are arranged in the order in which they are defined in the request. When “alongFloor” is set to true, only the loads placed last, at the edge, can be stacked because access to loads near the driver’s cab is limited.
- Many loads using all available floor space – all load types
- Different “alongFloor” and “stacking” values for different cuboid loads
- Different “alongFloor” and “stacking” values for different load types
3. “maxWeightOnTop” – tier weight, i.e. the maximum weight that can be placed on top of a load – other loads may stand on a given load as long as their combined weight is not exceeded
Examples – tier weight vs. number of tiers
5. “boxesBelowAllowed” – “specifying the loads below” , an array of ids of the loads that can be placed under a given load
Examples
- Without specifying which loads the given load can be placed on
- With the loads the given load can be placed on specified
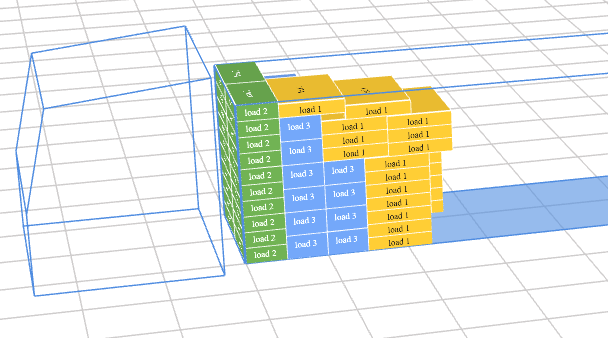
6. “pctSupport” – degree of support – allows larger loads to be stacked on smaller ones
- by default the degree of support is 100% – in which case only loads whose top load has the same support surface as the bottom load are stacked,
- if we set a degree of support lower than 100%, e.g. 30%, this means a larger load can be placed on a smaller one. The degree of support is set for the upper load; with “pctSupport” : 30, the support/contact surface between the loads must be no less than 30% of our load, for which we are allowing placement on a smaller load
Examples
Stacking examples
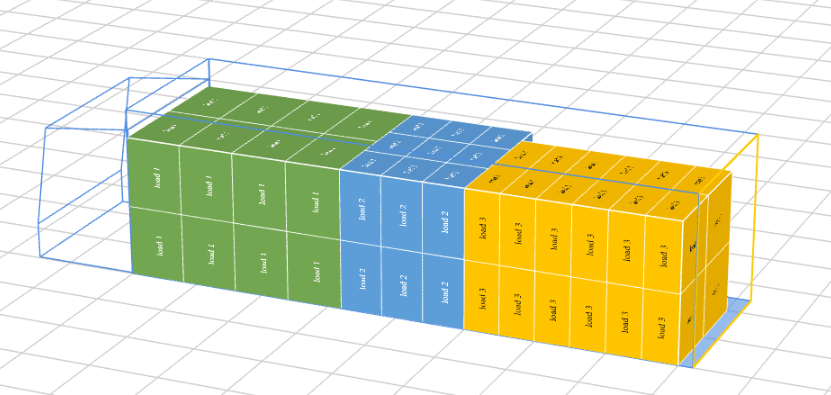
“Stacking”: true for all loads
Stacks all loads as optimally as possible, including one type of load on top of another
Request
{
 "loads": [
        {
           "quantity": 16,
           "name": "load 1",
           "color": "#71A34E",
           "length": 120,
           "width": 80,
           "height": 100,
           "weight": 50,
           "stacking": true
        },
         {
           "quantity": 18,
           "name": "load 2",
           "color": "#5B9BD5",
           "length": 80,
           "width": 60,
           "height": 100,
           "weight": 60,
           "stacking": true
        },
        {
           "quantity": 24,
           "name": "load 3",
           "color": "#FFC000",
           "length": 100,
           "width": 50,
           "height": 100,
           "weight": 80,
           "stacking": true
        }
],
        "loadingSpaces": [
         {
            "quantity": 1,
            "name": "Solowka 20 EP",
            "parts": [
                {
                    "length": 820,
                    "width": 245,
                    "height": 240,
                    "limit": 8000
                }
            ]
        }


    ],
     "options": {
                }
}
Result
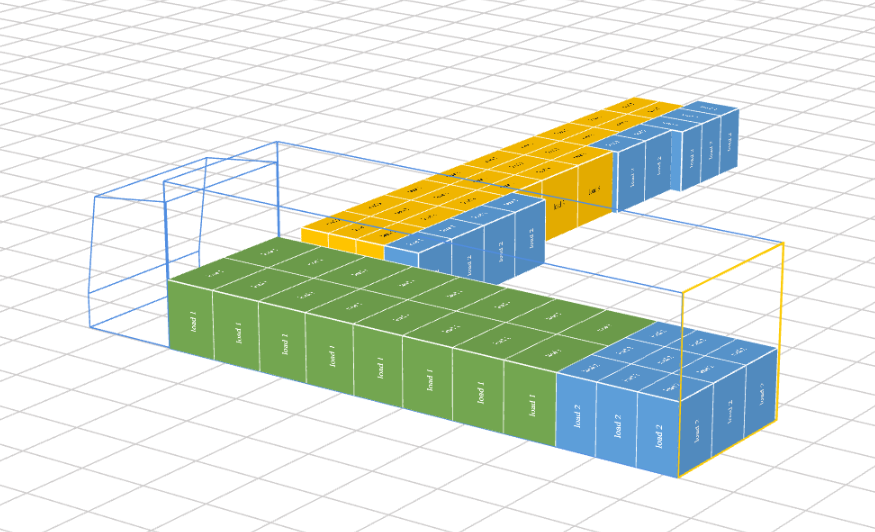
“Stacking”: false for all loads
Request
{
 "loads": [
        {
           "quantity": 16,
           "name": "load 1",
           "color": "#71A34E",
           "length": 120,
           "width": 80,
           "height": 100,
           "weight": 50,
           "stacking": false
        },
         {
           "quantity": 18,
           "name": "load 2",
           "color": "#5B9BD5",
           "length": 80,
           "width": 60,
           "height": 100,
           "weight": 60,
           "stacking": false
        },
        {
           "quantity": 24,
           "name": "load 3",
           "color": "#FFC000",
           "length": 100,
           "width": 50,
           "height": 100,
           "weight": 80,
           "stacking": false
        }
],
        "loadingSpaces": [
         {
            "quantity": 1,
            "name": "Solowka 20 EP",
            "parts": [
                {
                    "length": 820,
                    "width": 245,
                    "height": 240,
                    "limit": 8000
                }
            ]
        }
    ],
     "options": {
                }
}
Result
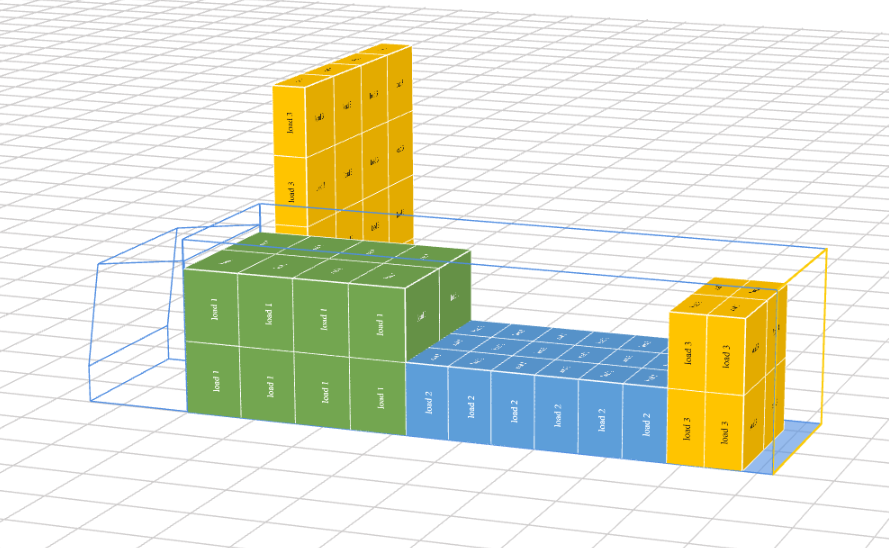
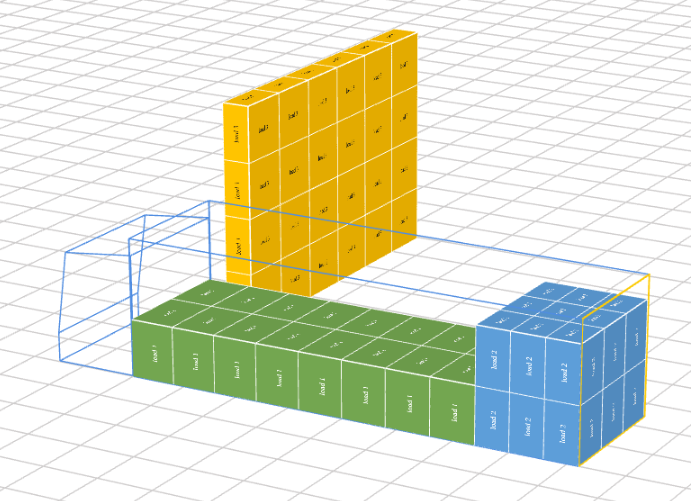
“Stacking”: “true” and “false”
Example 1
Request
{
 "loads": [
        {
           "quantity": 16,
           "name": "load 1",
           "color": "#71A34E",
           "length": 120,
           "width": 80,
           "height": 100,
           "weight": 50,
           "stacking": true
        },
         {
           "quantity": 18,
           "name": "load 2",
           "color": "#5B9BD5",
           "length": 80,
           "width": 60,
           "height": 100,
           "weight": 60,
           "stacking": false
        },
        {
           "quantity": 24,
           "name": "load 3",
           "color": "#FFC000",
           "length": 100,
           "width": 50,
           "height": 100,
           "weight": 80,
           "stacking": true
        }
],
        "loadingSpaces": [
         {
            "quantity": 1,
            "name": "Solowka 20 EP",
            "parts": [
                {
                    "length": 820,
                    "width": 245,
                    "height": 240,
                    "limit": 8000
                }
            ]
        }
    ],
     "options": {
                }
}
Result
Example 2
Request
{
 "loads": [
        {
           "quantity": 16,
           "name": "load 1",
           "color": "#71A34E",
           "length": 120,
           "width": 80,
           "height": 100,
           "weight": 50,
           "stacking": false
        },
         {
           "quantity": 18,
           "name": "load 2",
           "color": "#5B9BD5",
           "length": 80,
           "width": 60,
           "height": 100,
           "weight": 60,
           "stacking": true
        },
        {
           "quantity": 24,
           "name": "load 3",
           "color": "#FFC000",
           "length": 100,
           "width": 50,
           "height": 100,
           "weight": 80,
           "stacking": true
        }
],
        "loadingSpaces": [
         {
            "quantity": 1,
            "name": "Solowka 20 EP",
            "parts": [
                {
                    "length": 820,
                    "width": 245,
                    "height": 240,
                    "limit": 8000
                }
            ]
        }
    ],
     "options": {
                }
}
Result
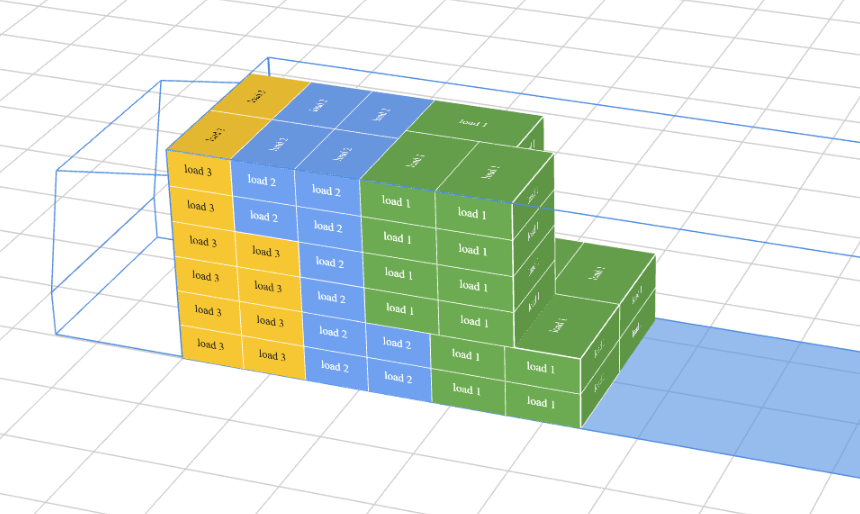
Number of tiers for a given load
“Stacking” – without specifying the number of tiers
Request
{
   "loads": [
        {
           "quantity": 20,
           "name": "load 1",
           "length": 120,
           "width": 80,
           "height": 40,
           "weight": 50,
           "stacking": true,
           "priority": 3
        },
         {
           "quantity": 20,
           "name": "load 2",
           "length": 100,
           "width": 70,
           "height": 40,
           "weight": 80,
           "stacking": true,
           "priority": 2
        },
        {
           "quantity": 20,
           "name": "load 3",
           "length": 100,
           "width": 70,
           "height": 40,
           "weight": 100,
           "stacking": true,
           "priority": 1
        }
   ],
       "loadingSpaces": [
        {
            "quantity": 1,
            "name": "Solowka 20 EP",
            "parts": [
                {
                    "length": 820,
                    "width": 245,
                    "height": 240,
                    "limit": 8000
                }
            ]
        }
    ],
  "options": {
    "loadingOrder": "priority"
            }
}
Result
“Stacking” – different number of tiers for individual loads
Request
 {
   "loads": [
        {
           "quantity": 20,
           "name": "load 1",
           "length": 120,
           "width": 80,
           "height": 40,
           "weight": 50,
           "stacking": 3,
           "priority": 3
        },
         {
           "quantity": 20,
           "name": "load 2",
           "length": 100,
           "width": 70,
           "height": 40,
           "weight": 80,
           "stacking": 4,
           "priority": 2
        },
        {
           "quantity": 20,
           "name": "load 3",
           "length": 100,
           "width": 70,
           "height": 40,
           "weight": 100,
           "stacking": 5,
           "priority": 1
        }
   ],
       "loadingSpaces": [
        {
            "quantity": 1,
            "name": "Solowka 20 EP",
            "parts": [
                {
                    "length": 820,
                    "width": 245,
                    "height": 240,
                    "limit": 8000
                }
            ]
        }
    ],
  "options": {
    "loadingOrder": "priority"
            }
}
Result
Tier weight – “maxWeightOnTop”
Tier weight without setting the number of tiers
Request
{
   "loads": [
        {
           "quantity": 20,
           "name": "load 1",
           "length": 120,
           "width": 80,
           "height": 40,
           "weight": 50,
           "stacking": true,
           "priority": 3,
           "maxWeightOnTop": 100
        },
         {
           "quantity": 20,
           "name": "load 2",
           "length": 100,
           "width": 70,
           "height": 40,
           "weight": 80,
           "stacking": true,
           "priority": 2,
           "maxWeightOnTop": 150
        },
        {
           "quantity": 20,
           "name": "load 3",
           "length": 100,
           "width": 70,
           "height": 40,
           "weight": 100,
           "stacking": true,
           "priority": 1,
           "maxWeightOnTop": 300
        }
   ],
       "loadingSpaces": [
        {
            "quantity": 1,
            "name": "Solowka 20 EP",
            "parts": [
                {
                    "length": 820,
                    "width": 245,
                    "height": 240,
                    "limit": 8000
                }
            ]
        }
    ],
  "options": {
    "loadingOrder": "priority"
            }
}
Result
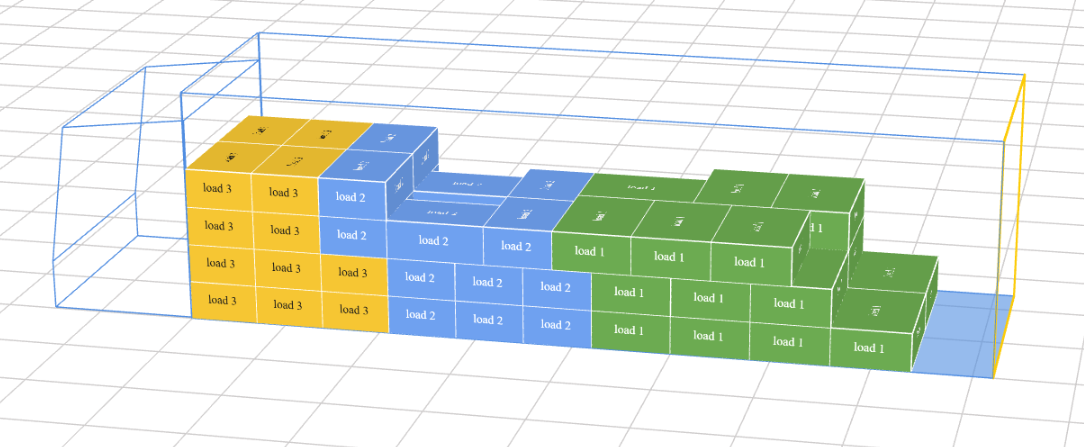
Tier weight with the number of tiers set
Request
{
   "loads": [
        {
           "quantity": 20,
           "name": "load 1",
           "length": 120,
           "width": 80,
           "height": 40,
           "weight": 50,
           "stacking": 3,
           "priority": 3,
           "maxWeightOnTop": 100
        },
         {
           "quantity": 20,
           "name": "load 2",
           "length": 100,
           "width": 70,
           "height": 40,
           "weight": 80,
           "stacking": 4,
           "priority": 2,
           "maxWeightOnTop": 150
        },
        {
           "quantity": 20,
           "name": "load 3",
           "length": 100,
           "width": 70,
           "height": 40,
           "weight": 100,
           "stacking": 5,
           "priority": 1,
           "maxWeightOnTop": 300
        }
   ],
       "loadingSpaces": [
        {
            "quantity": 1,
            "name": "Solowka 20 EP",
            "parts": [
                {
                    "length": 820,
                    "width": 245,
                    "height": 240,
                    "limit": 8000
                }
            ]
        }
    ],
  "options": {
    "loadingOrder": "priority"
            }
}
Result
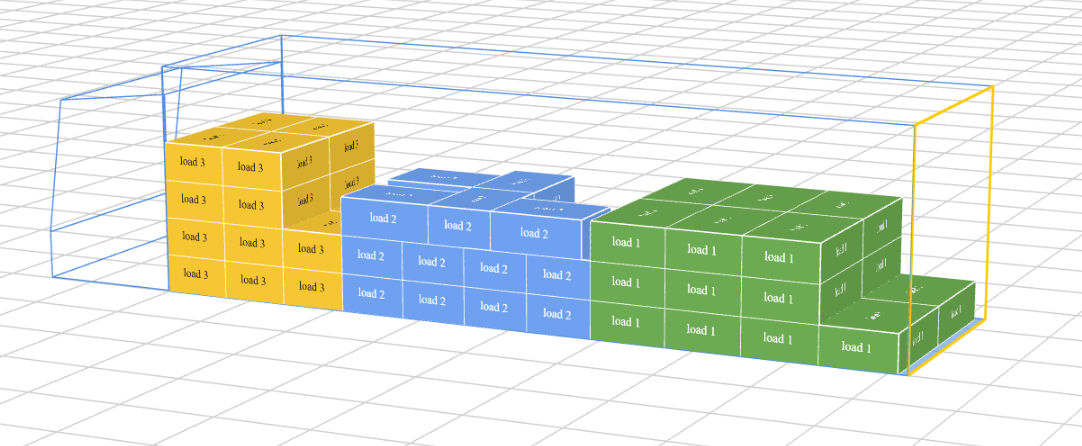
Selecting loads for stacking – “boxesBelowAllowed”
Selecting loads for stacking means that a given load can only stand on the loads specified in the table.
For each load, you must provide the identifiers of the loads, which are then placed in the “boxesBelowAllowed” array.
Below are 2 comparison examples.
Without specifying which loads the given load can be placed on
Request
{
   "loads": [
        {
           "quantity": 20,
           "name": "load 1",
           "length": 120,
           "width": 80,
           "height": 40,
           "weight": 50,
           "stacking": true
         },
         {
           "quantity": 20,
           "name": "load 2",
           "length": 100,
           "width": 70,
           "height": 40,
           "weight": 80,
           "stacking": true
        },
        {
           "quantity": 20,
           "name": "load 3",
           "length": 100,
           "width": 70,
           "height": 40,
           "weight": 100,
           "stacking": true
        }
   ],
       "loadingSpaces": [
        {
            "quantity": 1,
            "name": "Solowka 20 EP",
            "parts": [
                {
                    "length": 820,
                    "width": 245,
                    "height": 240,
                    "limit": 8000
                }
            ]
        }
    ],
  "options": {
             }
}
Result
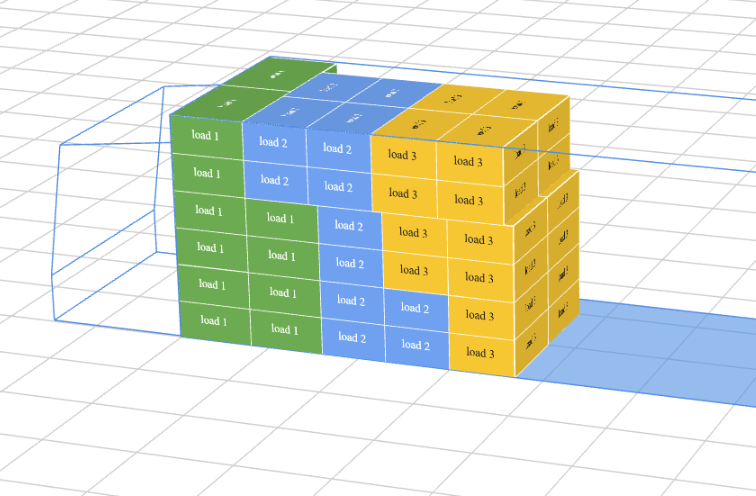
With the loads the given load can be placed on specified
In this request, placing Load 2 on Load 1 was allowed, but placing Load 3 on Load 2 was not.
Request
{
 "loads": [
        {
           "id": 1,
           "quantity": 20,
           "name": "load 1",
           "length": 120,
           "width": 80,
           "height": 40,
           "weight": 50,
           "stacking": true,
           "boxesBelowAllowed": [2,3]
         },
         {
           "id": 2,
           "quantity": 20,
           "name": "load 2",
           "length": 100,
           "width": 70,
           "height": 40,
           "weight": 80,
           "stacking": true,
           "boxesBelowAllowed": [1]
        },
        {
           "id": 3,
           "quantity": 20,
           "name": "load 3",
           "length": 100,
           "width": 70,
           "height": 40,
           "weight": 100,
           "stacking": true,
          "boxesBelowAllowed": [1]
        }
   ],
       "loadingSpaces": [
        {
            "quantity": 1,
            "name": "Solowka 20 EP",
            "parts": [
                {
                    "length": 820,
                    "width": 245,
                    "height": 240,
                    "limit": 8000
                }
            ]
        }
    ],
  "options": {
                }
}
Result
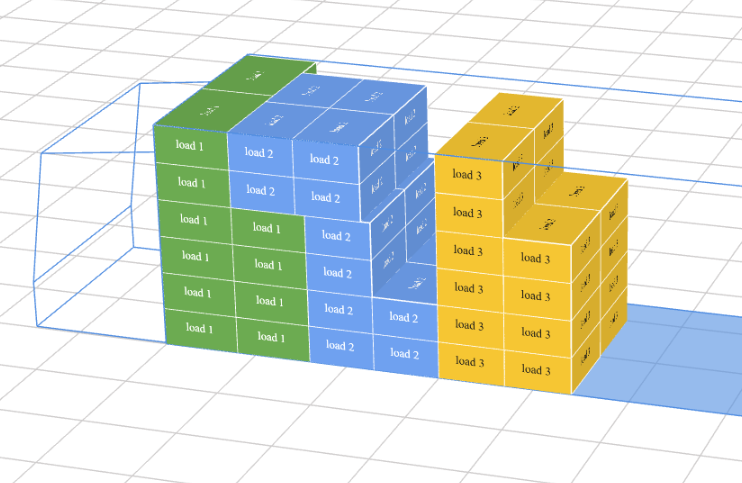
Stacking – “alongFloor”
Small number of loads – cuboid loads
Request
{
 "loads": [
        {
           "quantity": 9,
           "name": "load 1",
           "length": 120,
           "width": 80,
           "height": 100,
           "weight": 100,
           "stacking": true,
           "alongFloor": true
        },
         {
           "quantity": 8,
           "name": "load 2",
           "length": 100,
           "width": 70,
           "height": 80,
           "weight": 80,
           "stacking": true,
           "alongFloor": true
        },
        {
           "quantity": 7,
           "name": "load 3",
           "length": 100,
           "width": 50,
           "height": 80,
           "weight": 50,
           "stacking": true,
           "alongFloor": true
        }
],
        "loadingSpaces": [
        {
            "quantity": 1,
            "name": "Solowka 20 EP",
            "parts": [
                {
                    "length": 820,
                    "width": 245,
                    "height": 240,
                    "limit": 8000
                }
            ]
        }
    ],
   "options": {
             }
}
Result
Small number of loads – all load types
Request
{
"loads": [
        {
           "quantity": 9,
           "name": "load 1",
           "length": 120,
           "diameter": 80,
           "weight": 100,
           "loadType": 2,
           "stacking": true,
           "alongFloor": true
        },
         {
           "quantity": 8,
           "name": "load 2",
           "diameter": 50,
           "height": 80,
           "weight": 80,
           "loadType": 1,
           "stacking": true,
           "alongFloor": true
        },
        {
           "quantity": 7,
           "name": "load 3",
           "length": 100,
           "width": 50,
           "height": 80,
           "weight": 50,
           "stacking": true,
           "alongFloor": true
        }
],


        "loadingSpaces": [
        {
            "quantity": 1,
            "name": "Solowka 20 EP",
            "parts": [
                {
                    "length": 820,
                    "width": 245,
                    "height": 240,
                    "limit": 8000
                }
            ]
        }
    ],

  "options": {
             }
}
Result
Many loads using all available floor space – cuboid loads
Request
{
 "loads": [
        {
           "quantity": 13,
           "name": "load 1",
           "length": 120,
           "width": 80,
           "height": 100,
           "weight": 100,
           "stacking": true,
           "alongFloor": true
        },
         {
           "quantity": 10,
           "name": "load 2",
           "length": 100,
           "width": 70,
           "height": 80,
           "weight": 80,
           "stacking": true,
           "alongFloor": true
        },
        {
           "quantity": 11,
           "name": "load 3",
           "length": 100,
           "width": 50,
           "height": 80,
           "weight": 50,
           "stacking": true,
           "alongFloor": true
        }
],


        "loadingSpaces": [
        {
            "quantity": 1,
            "name": "Solowka 20 EP",
            "parts": [
                {
                    "length": 820,
                    "width": 245,
                    "height": 240,
                    "limit": 8000
                }
            ]
        }
    ],

  "options": {
             }
}
Result
Many loads using all available floor space – all load types
Request
{
 "loads": [
        {
           "quantity": 13,
           "name": "load 1",
           "length": 120,
           "diameter": 80,
           "weight": 100,
           "loadType": 2,
           "stacking": true,
           "alongFloor": true
        },
         {
           "quantity": 12,
           "name": "load 2",
           "diameter": 50,
           "height": 80,
           "weight": 80,
           "loadType": 1,
           "stacking": true,
           "alongFloor": true
        },
        {
           "quantity": 10,
           "name": "load 3",
           "length": 100,
           "width": 50,
           "height": 80,
           "weight": 50,
           "stacking": true,
           "alongFloor": true
        }
],

        "loadingSpaces": [
        {
            "quantity": 1,
            "name": "Solowka 20 EP",
            "parts": [
                {
                    "length": 820,
                    "width": 245,
                    "height": 240,
                    "limit": 8000
                }
            ]
        }
    ],

  "options": {
             }
}
Result
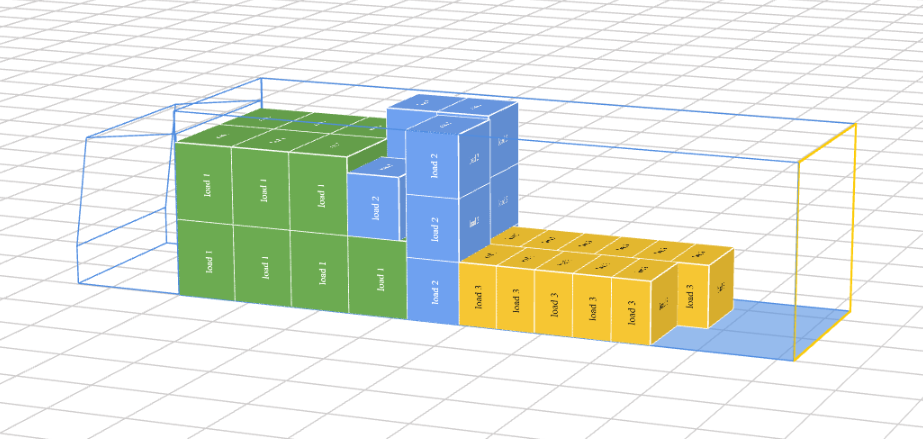
Different “alongFloor” values for different cuboid loads
For the same loads as in point 3, different values were set for the “alongFloor” parameters:
- for “load 1” and “load 2” it was set to: alongFloor”: false
- for “load 3” it was set to: “alongFloor”: true
Request
{
 "loads": [
        {
           "quantity": 13,
           "name": "load 1",
           "length": 120,
           "width": 80,
           "height": 100,
           "weight": 100,
           "stacking": true,
           "alongFloor": false
        },
         {
           "quantity": 10,
           "name": "load 2",
           "length": 100,
           "width": 70,
           "height": 80,
           "weight": 80,
           "stacking": true,
           "alongFloor": false
        },
        {
           "quantity": 11,
           "name": "load 3",
           "length": 100,
           "width": 50,
           "height": 80,
           "weight": 50,
           "stacking": true,
           "alongFloor": true
        }
],
        "loadingSpaces": [
        {
            "quantity": 1,
            "name": "Solowka 20 EP",
            "parts": [
                {
                    "length": 820,
                    "width": 245,
                    "height": 240,
                    "limit": 8000
                }
            ]
        }
    ],
     "options": {
                }
}
Result
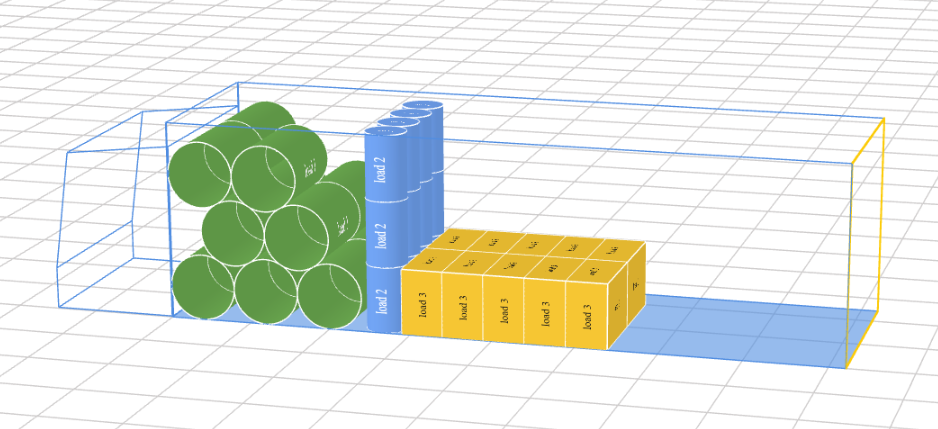
Different “alongFloor” values for different load types
For the same loads as in point 3, different values were set for the “alongFloor” parameters:
- for “load 1” and “load 2” it was set to: alongFloor”: false
- for “load 3” it was set to: “alongFloor”: true
Request
{
 "loads": [
        {
           "quantity": 13,
           "name": "load 1",
           "length": 120,
           "diameter": 80,
           "weight": 100,
           "loadType": 2,
           "stacking": true,
           "alongFloor": false
        },
         {
           "quantity": 12,
           "name": "load 2",
           "diameter": 50,
           "height": 80,
           "weight": 80,
           "loadType": 1,
           "stacking": true,
           "alongFloor": false
        },
        {
           "quantity": 10,
           "name": "load 3",
           "length": 100,
           "width": 50,
           "height": 80,
           "weight": 50,
           "stacking": true,
           "alongFloor": true
        }
],
        "loadingSpaces": [
        {
            "quantity": 1,
            "name": "Solowka 20 EP",
            "parts": [
                {
                    "length": 820,
                    "width": 245,
                    "height": 240,
                    "limit": 8000
                }
            ]
        }
    ],
   "options": {
              }
}
Result
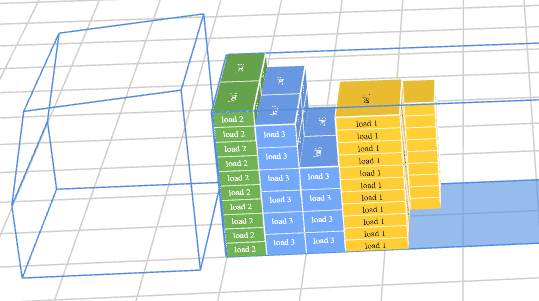
Degree of support
Without specifying the degree of support
{
   "loads": [
        {
           "quantity": 20,
           "name": "load 2",
           "length": 100,
           "width": 50,
           "height": 20,
           "weight": 500,
           "stacking": true
        },
        {
           "quantity": 20,
           "name": "load 3",
           "length": 100,
           "width": 50,
           "height": 30,
           "weight": 500,
            "stacking": true
           },
    {
           "quantity": 20,
           "name": "load 1",
           "length": 120,
           "width": 80,
           "height": 17,
           "weight": 100,
           "stacking": true
    }
   ],
       "loadingSpaces": [
        {
            "quantity": 1,
            "name": "truck 1",
            "parts": [
                {
                    "length": 1300,
                    "width": 200,
                    "height": 200,
                    "limit": 24000
                }
            ]
        }
    ],
  "options": {
               }
}
Degree of support 50%
{
   "loads": [
        {
           "quantity": 20,
           "name": "load 2",
           "length": 100,
           "width": 50,
           "height": 20,
           "weight": 500,
           "pctSupport": 50,
    	     "stacking": true
        },
        {
           "quantity": 20,
           "name": "load 3",
           "length": 100,
           "width": 50,
           "height": 30,
           "weight": 500,
           "stacking": true
         },
    {
           "quantity": 20,
           "name": "load 1",
           "length": 120,
           "width": 80,
           "height": 17,
           "weight": 100,
           "stacking": true,
           "pctSupport": 50
    }
   ],
       "loadingSpaces": [
        {
            "quantity": 1,
            "name": "truck 1",
            "parts": [
                {
                    "length": 1300,
                    "width": 200,
                    "height": 200,
                    "limit": 24000
                }
            ]
        }
    ],
  "options": {
               }
}
Rotation
Load rotation is governed by the following parameters:
- allowToRotate – default value “true” – allows loads to be rotated about their base only, which applies to cuboids and pipes
- rotateFreely – default value “false” – allows free rotation of cuboids only
The rules for rotating and placing each load type within the loading space are described in the section Different load types.
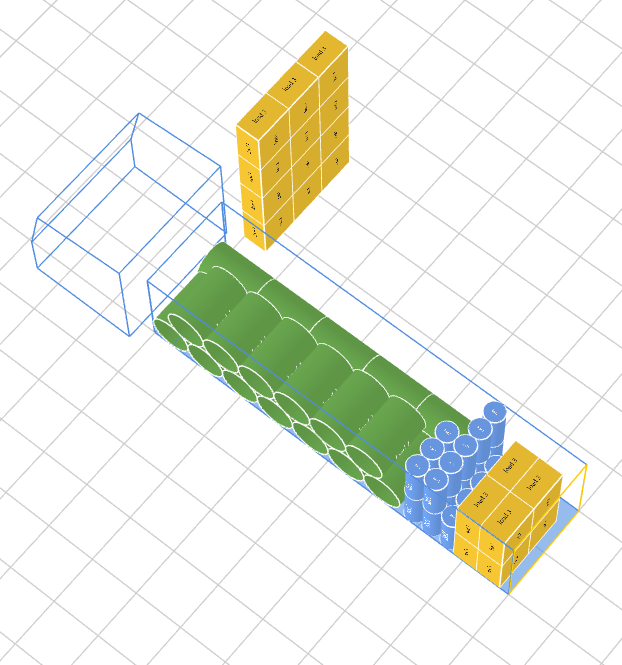
Default rotation values
Parameter settings:
- allowToRotate: true
- rotateFreely: false
Request
{
 "loads": [
        {
           "quantity": 18,
           "name": "load 1",
           "length": 120,
           "diameter": 80,
           "weight": 100,
           "loadType": 2,
           "stacking": true,
           "alongFloor": false
          },
         {
           "quantity": 20,
           "name": "load 2",
          "height": 100,
           "diameter": 40,
           "weight": 500,
           "loadType": 1,
           "stacking": true,
           "alongFloor": false
          },
        {
           "quantity": 20,
           "name": "load 3",
           "length": 80,
           "width": 50,
           "height": 100,
           "weight": 500,
           "stacking": true,
           "alongFloor": true
         }
],
        "loadingSpaces": [
        {
            "quantity": 1,
            "name": "truck 2",
            "parts": [
                {
                    "length": 800,
                    "width": 200,
                    "height": 200,
                    "limit": 24000
                }
            ]
        }
    ],
     "options": {
                }
}
Result
Rotation lock
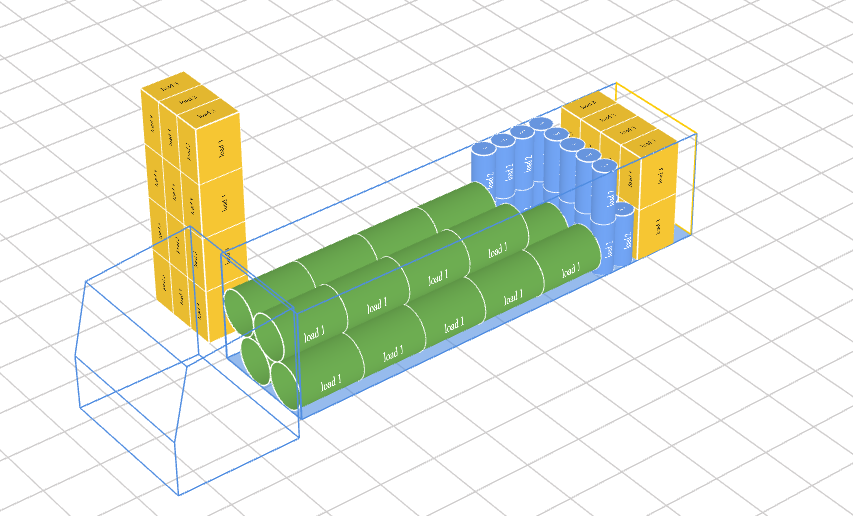
Parameter settings:
- allowToRotate: false
- rotateFreely: false
Request
{
 "loads": [
        {
           "quantity": 18,
           "name": "load 1",
           "length": 120,
           "diameter": 80,
           "weight": 100,
           "loadType": 2,
           "stacking": true,
           "alongFloor": false,
           "allowToRotate": false,
           "rotateFreely": false
        },
         {
           "quantity": 20,
           "name": "load 2",
          "height": 100,
           "diameter": 40,
           "weight": 500,
           "loadType": 1,
           "stacking": true,
           "alongFloor": false,
           "allowToRotate": false,
           "rotateFreely": false
        },
        {
           "quantity": 20,
           "name": "load 3",
           "length": 80,
           "width": 50,
           "height": 100,
           "weight": 500,
           "stacking": true,
           "alongFloor": true,
           "allowToRotate": false,
           "rotateFreely": false
        }
],
        "loadingSpaces": [
        {
            "quantity": 1,
            "name": "truck 2",
            "parts": [
                {
                    "length": 800,
                    "width": 200,
                    "height": 200,
                    "limit": 24000
                }
            ]
        }
    ],
     "options": {
                }
}
Result
Rotating cuboids
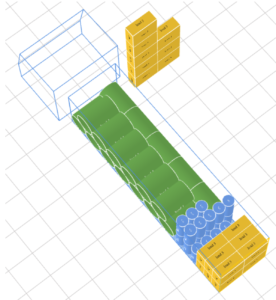
Case 1
Parameter settings:
- allowToRotate: true
- rotateFreely: false
Request
{
 "loads": [
        {
           "quantity": 18,
           "name": "load 1",
           "length": 120,
           "diameter": 80,
           "weight": 100,
           "loadType": 2,
           "stacking": true,
           "alongFloor": false,
           "allowToRotate": true,
           "rotateFreely": false
        },
         {
           "quantity": 20,
           "name": "load 2",
          "height": 100,
           "diameter": 40,
           "weight": 500,
           "loadType": 1,
           "stacking": true,
           "alongFloor": false,
           "allowToRotate": true,
           "rotateFreely": false
        },
        {
           "quantity": 20,
           "name": "load 3",
           "length": 100,
           "width": 40,
           "height": 80,
           "weight": 500,
           "stacking": true,
           "alongFloor": true,
           "allowToRotate": true,
           "rotateFreely": false
        }
],
        "loadingSpaces": [
        {
            "quantity": 1,
            "name": "truck 2",
            "parts": [
                {
                    "length": 800,
                    "width": 200,
                    "height": 200,
                    "limit": 24000
                }
            ]
        }
    ],
     "options": {
                }
}
Result
Case 2
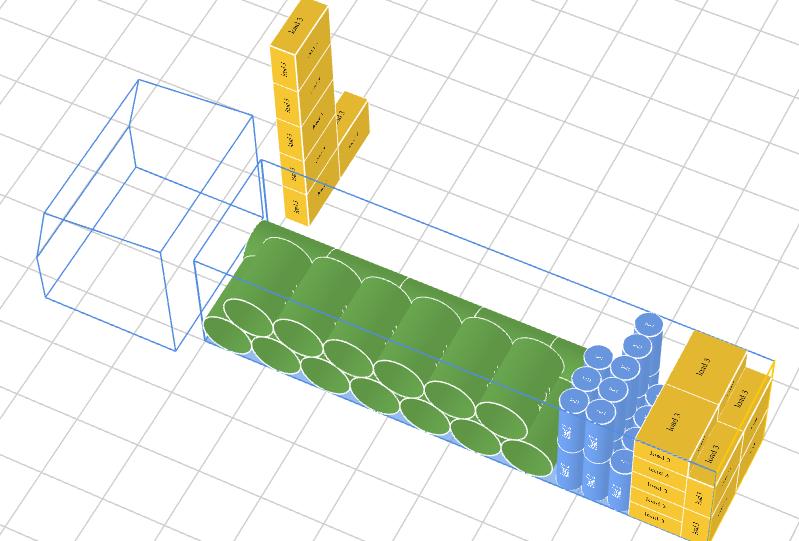
Parameter settings:
- allowToRotate: true
- rotateFreely: true
Request
{
 "loads": [
        {
           "quantity": 18,
           "name": "load 1",
           "length": 120,
           "diameter": 80,
           "weight": 100,
           "loadType": 2,
           "stacking": true,
           "alongFloor": false,
           "allowToRotate": true,
           "rotateFreely": false
        },
         {
           "quantity": 20,
           "name": "load 2",
          "height": 100,
           "diameter": 40,
           "weight": 500,
           "loadType": 1,
           "stacking": true,
           "alongFloor": false,
           "allowToRotate": true,
           "rotateFreely": false
        },
        {
           "quantity": 20,
           "name": "load 3",
           "length": 100,
           "width": 40,
           "height": 80,
           "weight": 500,
           "stacking": true,
           "alongFloor": true,
           "allowToRotate": true,
           "rotateFreely": true
        }
],
        "loadingSpaces": [
        {
            "quantity": 1,
            "name": "truck 2",
            "parts": [
                {
                    "length": 800,
                    "width": 200,
                    "height": 200,
                    "limit": 24000
                }
            ]
        }
    ],
     "options": {
                }
}
Result
Multistops
Rules for using the Multistops feature
The Multistops feature lets you account for several loading and unloading points along a route. Multistops apply to a single loading space only and must have at least 3 stops defined along the route.
- To use the Multistops feature, set the following parameter in the algorithm options
 "options": {
                "multiStops": true
}- In the loading space, specify the number of stops required along the route
"loadingSpaces": [
        {
         …
           "stops": [
                {
                    "id": 1,
                    "name": "stop 1"
                },
                {
                    "id": 2,
                    "name": "stop 2"
                },
                {
                    "id": 3,
                    "name": "stop 3"
                },
                {
                    "id": 4,
                    "name": "stop 4"
                }
                ]
         …
         }
        ]
3. For each load, specify its loading and unloading point by referencing the id and name of a stop defined in the loading space.
   "loads": [
        {
            "quantity": 10,
            "name": "load 1",
            "length": 120,
            "width": 80,
            "height": 100,
            "weight": 100,
            "origin": {
                "id": 1,
                "name": "stop 1"
            },
            "destination": {
                "id": 3,
                "name": "stop 3"
            }
        }
        …
           ]
Example
Below is an example that accounts for 4 loads and 4 stops along the route.
{
    "loads": [
        {
            "quantity": 10,
            "name": "load 1",
            "length": 120,
            "width": 80,
            "height": 100,
            "weight": 100,
            "origin": {
                "id": 1,
                "name": "stop 1"
            },
            "destination": {
                "id": 3,
                "name": "stop 3"
            }
        },
        {
            "quantity": 20,
            "name": "load 2",
            "length": 100,
            "width": 60,
            "height": 20,
            "weight": 100,
            "origin": {
                "id": 1,
                "name": "stop 1"
            },
            "destination": {
                "id": 3,
                "name": "stop 3"
            }
        },
         {
            "quantity": 30,
            "name": "load 3",
            "length": 100,
            "width": 60,
            "height": 20,
            "weight": 100,
            "origin": {
                "id": 3,
                "name": "stop 3"
            },
            "destination": {
                "id": 4,
                "name": "stop 4"
            }
        },
        {
            "quantity": 40,
            "name": "load 4",
            "length": 100,
            "width": 60,
            "height": 20,
            "weight": 100,
            "origin": {
                "id": 2,
                "name": "stop 2"
            },
            "destination": {
                "id": 3,
                "name": "stop 3"
            }
        }
    ],
    "loadingSpaces": [
        {
            "quantity": 1,
            "name": "truck 1",
            "stops": [
                {
                    "id": 1,
                    "name": "stop 1"
                },
                {
                    "id": 2,
                    "name": "stop 2"
                },
                {
                    "id": 3,
                    "name": "stop 3"
                },
                {
                    "id": 4,
                    "name": "stop 4"
                }
            ],
            "parts": [
                {
                    "length": 600,
                    "width": 500,
                    "height": 200,
                    "limit": 24000
                }
            ],
            "type": "vehicle"
        }
    ],
    "options": {
                "multiStops": true
    }
}
Result
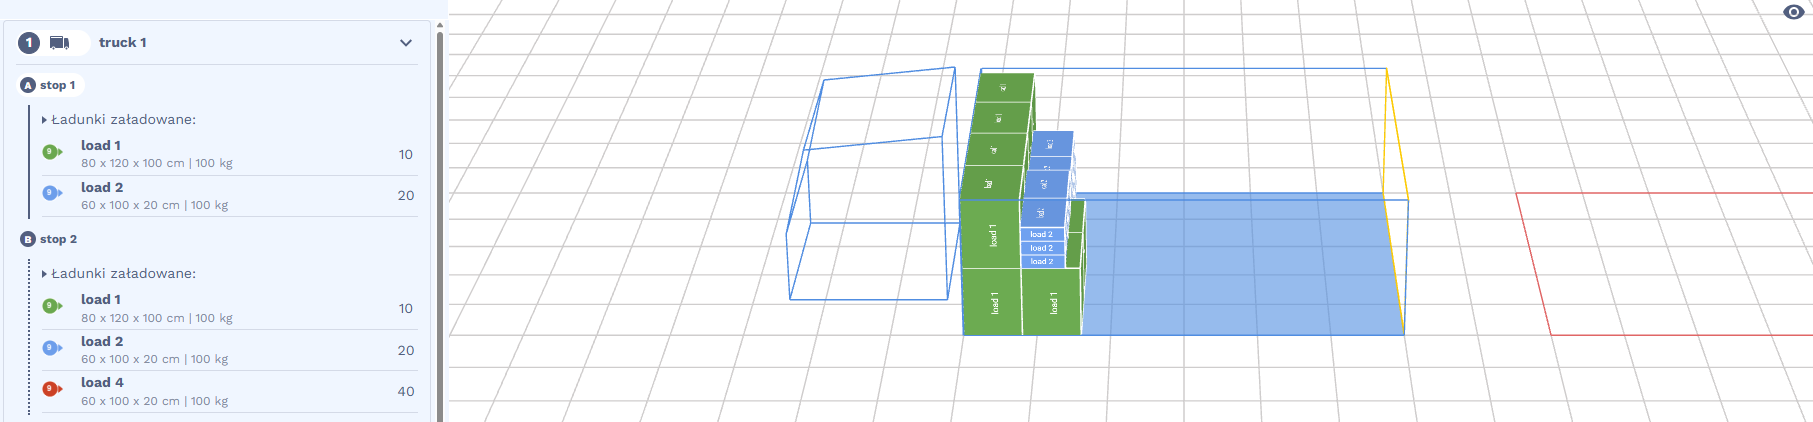
1. Stop 1 (stop 1) – “load 1” and “load 2” were loaded
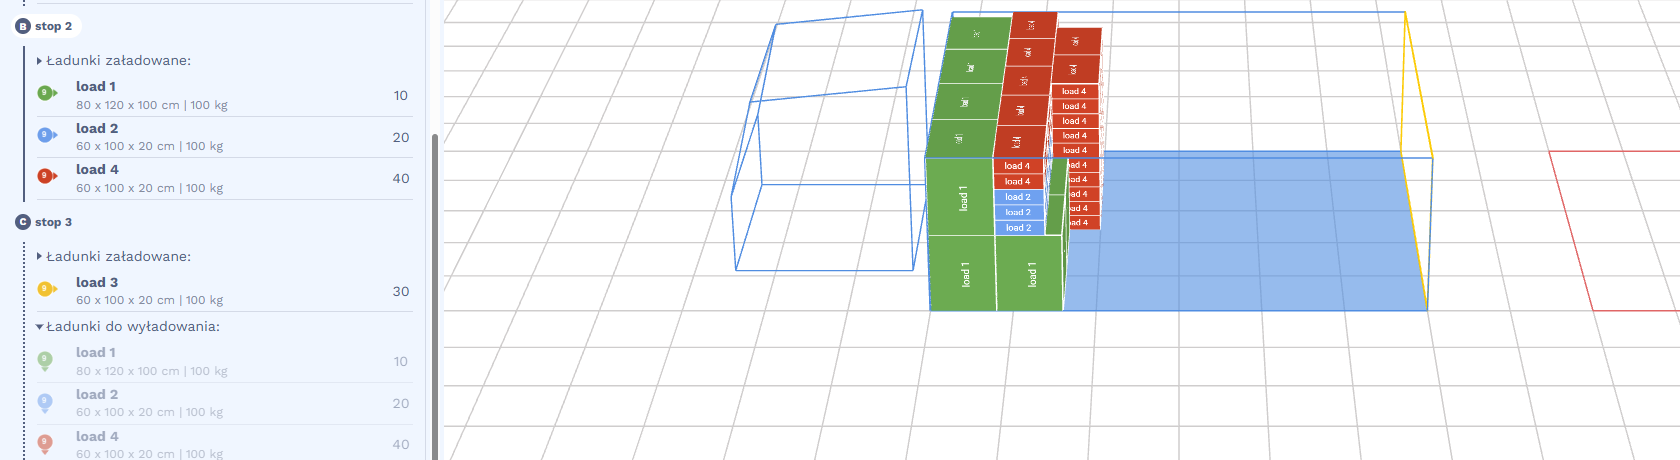
2. Stop 2 (stop 2) – “load 4” was loaded on top
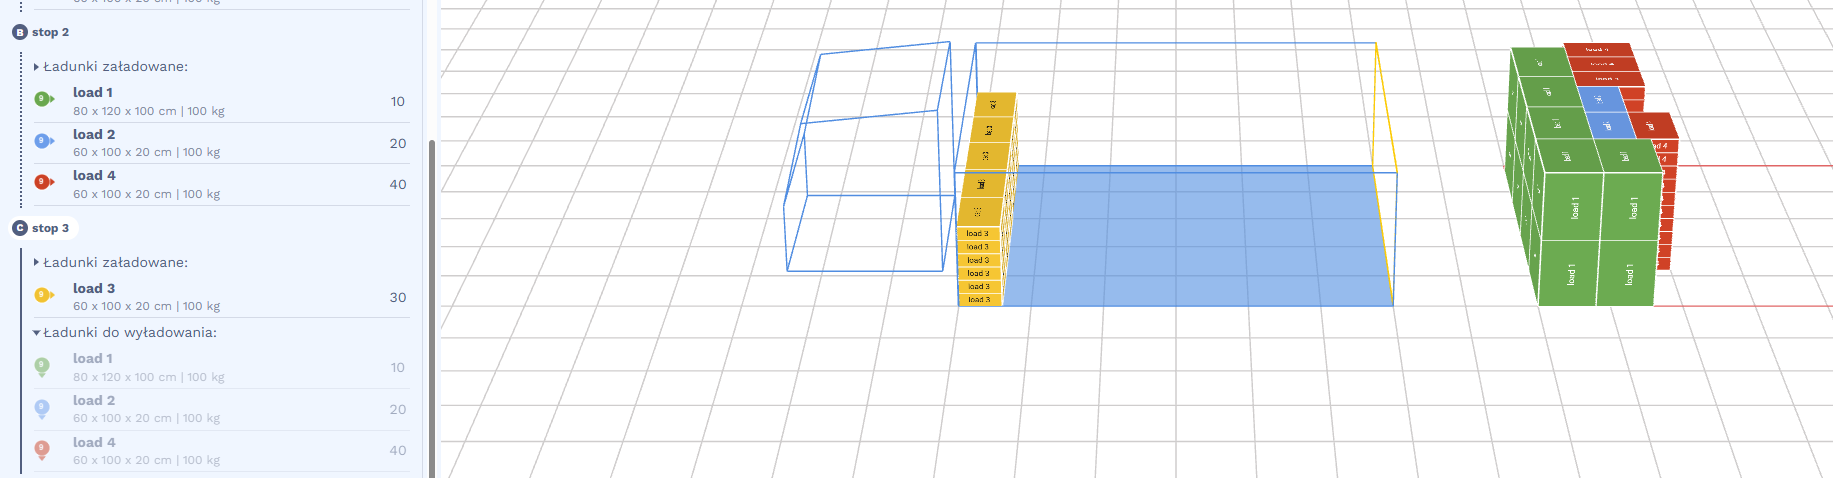
3. Stop 3 (stop 3) – “load 1”, “load 2”, “load 4” were unloaded, “load 3” was loaded
4. Stop 4 (stop 4) – “load 3” was unloaded