
Loading spaces
Types of loading spaces and splitting them into parts
Goodloading supports several kinds of loading space. Each one is defined through the “type” parameter, which can take any of the following values:
- “vehicle” – a truck (the default value)
- “sea” – a sea container
- air containers (2 types):
– “air x” – a container with two slanted sides
– “air y” – a container with one slanted side - “pallet” – a pallet
Every loading space can be divided into a maximum of 2 parts. This is useful, for example, when loading a combination unit, such as vehicles or sea containers. See Example 2: – Parts within loading spaces.
A detailed description of the parameters that define a loading space can be found in the chapter Loading space data (loadingSpaces)
Vehicles
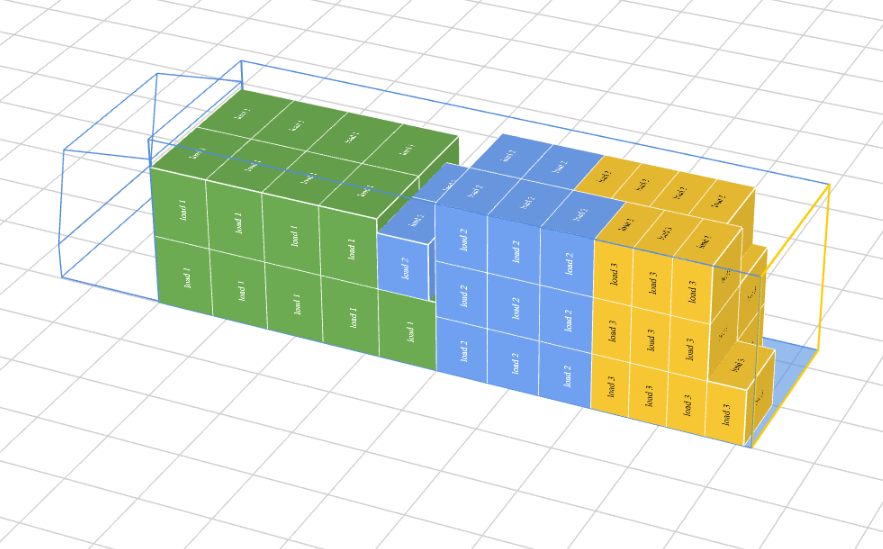
Arranging cargo inside a “vehicle” space
Request
{
 "loads": [
        {
           "quantity": 18,
           "name": "load 1",
           "length": 120,
           "width": 80,
           "height": 100,
           "weight": 200
        },
         {
           "quantity": 19,
           "name": "load 2",
           "length": 100,
           "width": 70,
           "height": 80,
           "weight": 160
        },
        {
           "quantity": 20,
           "name": "load 3",
           "length": 100,
           "width": 50,
           "height": 80,
           "weight": 50
        }
],
        "loadingSpaces": [
        {
            "type": "vehicle",
            "quantity": 1,
            "name": "Solowka 20 EP",
            "parts": [
                {
                    "length": 820,
                    "width": 245,
                    "height": 240,
                    "limit": 8000
                }
            ]
        }
    ],
     "options": {
                }
}
Result
Pallets
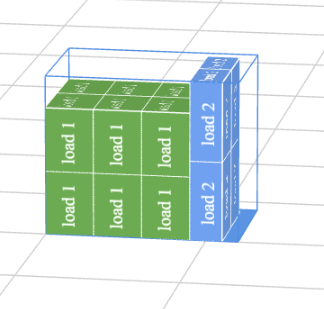
Arranging cargo inside a “pallet” space.
Without accounting for the pallet base “baseHeight”
Request
{
 "loads": [
        {
           "quantity": 12,
           "name": "load 1",
           "length": 40,
           "width": 30,
           "height": 40,
           "weight": 50
        },
         {
           "quantity": 4,
           "name": "load 2",
           "length": 35,
           "width": 20,
           "height": 50,
           "weight": 60
        }
],
        "loadingSpaces": [
        {
            "type": "pallet",
            "quantity": 1,
            "name": "Pallet",
            "parts": [
                {
                    "length": 120,
                    "width": 80,
                    "height": 100,
                    "limit": 1500
                }
            ]
        }
        ],
     "options": {
                }
}
Result
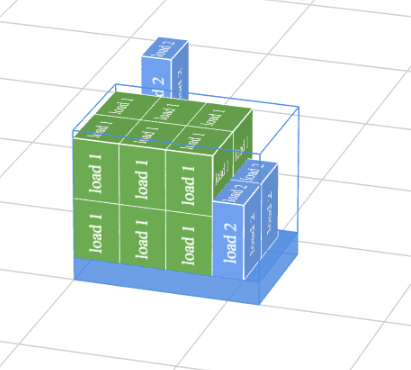
Accounting for the pallet base “baseHeight”
Request
{
 "loads": [
        {
           "quantity": 12,
           "name": "load 1",
           "length": 40,
           "width": 30,
           "height": 40,
           "weight": 50
        },
         {
           "quantity": 4,
           "name": "load 2",
           "length": 35,
           "width": 20,
           "height": 50,
           "weight": 60
        }
],
        "loadingSpaces": [
        {
            "type": "pallet",
            "quantity": 1,
            "name": "Pallet",
            "parts": [
                {
                    "baseHeight": 15,
                    "length": 120,
                    "width": 80,
                    "height": 100,
                    "limit": 1500
                }
            ]
        }
        ],
     "options": {
                }
}
Result
Sea containers
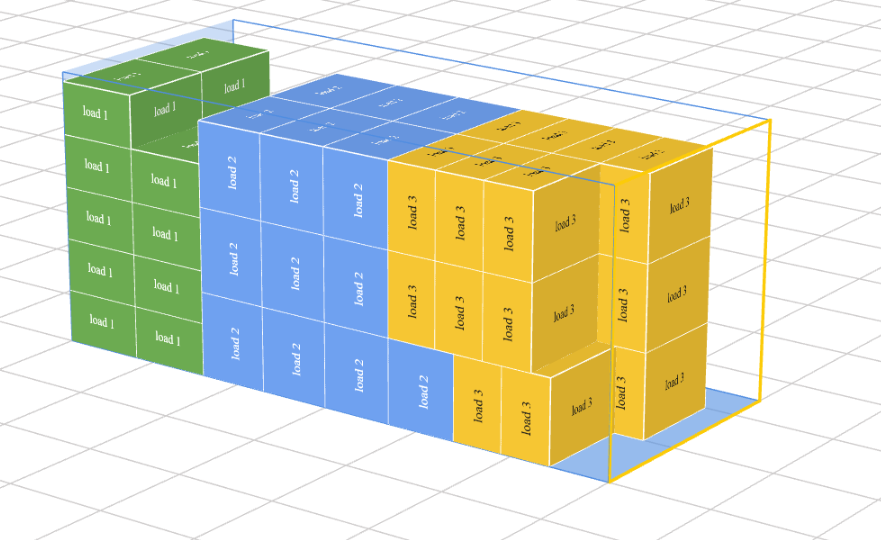
Arranging cargo inside a “sea” space.
Request:
{
 "loads": [
        {
           "quantity": 18,
           "name": "load 1",
           "length": 100,
           "width": 80,
           "height": 50,
           "weight": 200
        },
         {
           "quantity": 19,
           "name": "load 2",
           "length": 100,
           "width": 70,
           "height": 80,
           "weight": 160
        },
        {
           "quantity": 20,
           "name": "load 3",
           "length": 100,
           "width": 50,
           "height": 80,
           "weight": 100
        }
],
        "loadingSpaces": [
        {
            "type": "sea",
            "quantity": 1,
            "name": "sea",
            "parts": [
                {
                    "length": 600,
                    "width": 244,
                    "height": 259,
                    "limit": 22000
                }
            ]
        }
        ],
     "options": {
                }
}
Result
Air containers
Single-sided air container “air y”.
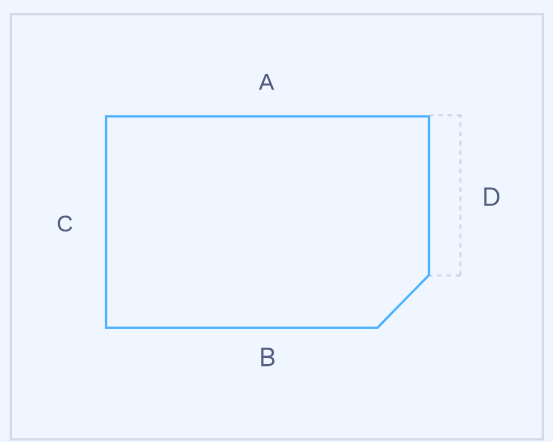
Defining a container comes down to setting the parameters below. The sample dimensions shown are for an LD2 container.
"parts": [
                {
                    "length": 155,
                    "width": 153,
                    "height": 163,
                    "base": 119,
                    "heightD": 112,
                    "limit": 1150
                }
            ],
where the values above map onto the drawing as follows:
- B – “base”
- A – “length”
- C – “hight
- D – “heightD”
Request:
{
 "loads": [
        {
           "quantity": 2,
           "name": "load 1",
           "length": 120,
           "width": 80,
           "height": 100,
           "weight": 100,
           "stacking": true,
           "alongFloor": true
        },
         {
           "quantity": 2,
           "name": "load 2",
           "length": 50,
           "width": 20,
           "height": 50,
           "weight": 400,
           "stacking": true,
           "alongFloor": true
        },
        {
           "quantity": 2,
           "name": "load 3",
           "length": 100,
           "width": 50,
           "height": 100,
           "weight": 500,
           "stacking": true,
           "alongFloor": true
        }
],
        "loadingSpaces": [
        {
            "type": "air y",
            "quantity": 1,
            "name": "zestaw",
            "parts": [
                {
                     "length": 155,
                    "width": 153,
                    "height": 163,
                    "base": 119,
                    "heightD": 112,
                    "limit": 1150
                }
            ]
        }
    ],
     "options": {
                }
}
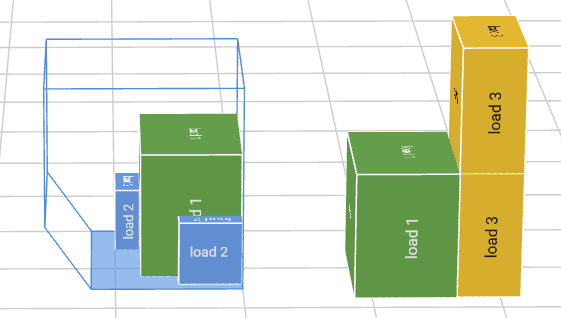
Result:
Double-sided air container “air x”
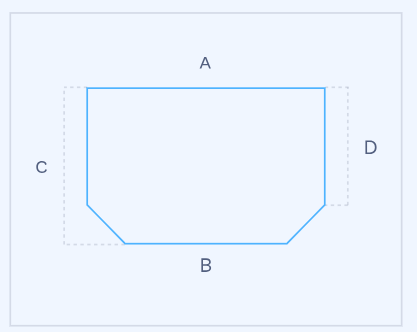
Defining a container comes down to setting the parameters below. The sample dimensions shown are for an LD3-45 container.
"parts": [
                {
                    "length": 242,
                    "width": 153,
                    "height": 114,
                    "base": 156,
                    "heightD": 61,
                    "limit": 1045
                }
            ],
where the values above map onto the drawing as follows:
- B – “base”
- A – “length”
- C – “hight
- D – “heightD”
Request:
{
 "loads": [
        {
           "quantity": 2,
           "name": "load 1",
           "length": 120,
           "width": 80,
           "height": 100,
           "weight": 100,
           "stacking": true,
           "alongFloor": true
        },
         {
           "quantity": 2,
           "name": "load 2",
           "length": 50,
           "width": 20,
           "height": 50,
           "weight": 400,
           "stacking": true,
           "alongFloor": true
        },
        {
           "quantity": 2,
           "name": "load 3",
           "length": 100,
           "width": 50,
           "height": 100,
           "weight": 500,
           "stacking": true,
           "alongFloor": true
        }
],
        "loadingSpaces": [
        {
            "type": "air x",
            "quantity": 1,
            "name": "zestaw",
            "parts": [
                {

                    "length": 242,
                    "width": 153,
                    "height": 114,
                    "base": 156,
                    "heightD": 61,
                    "limit": 1045

                }
            ]
        }
    ],
     "options": {
                }
}
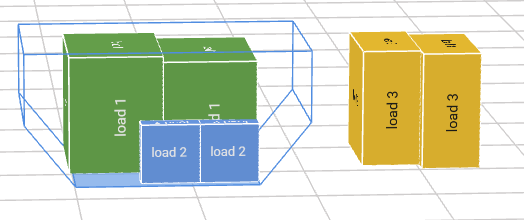
Result:
Parts within loading spaces
A loading space can consist of up to 2 parts. For a space of the vehicle type, this corresponds to a combination unit (a tractor with a trailer).
Request
{
 "loads": [
        {
           "quantity": 36,
           "name": "load 1",
           "length": 120,
           "width": 80,
           "height": 100,
           "weight": 100
        },
         {
           "quantity": 50,
           "name": "load 2",
           "length": 100,
           "width": 70,
           "height": 80,
           "weight": 80
        },
        {
           "quantity": 30,
           "name": "load 3",
           "length": 100,
           "width": 50,
           "height": 80,
           "weight": 100
        }
],
        "loadingSpaces": [
        {
            "type": "vehicle",
            "quantity": 1,
            "name": "vehicle",
            "parts": [
                {
                    "length": 700,
                    "width": 240,
                    "height": 305,
                    "limit": 6000
                },
                {   "length": 700,
                    "width": 240,
                    "height": 305,
                    "limit": 6000
                }

            ]
        }
    ],
     "options": {
                }
}
Result
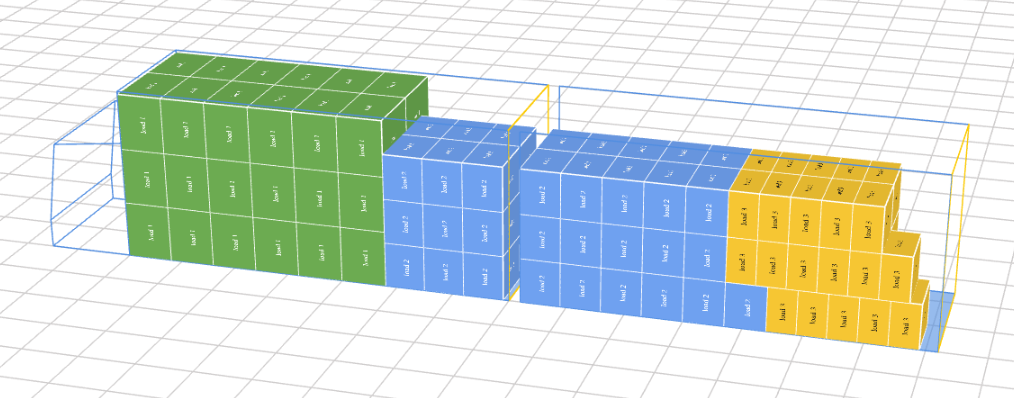
Loading methods
There are 4 loading methods available, controlled by the “loadingSide” parameter, which can take the following values:
- “back” [default]
- “top”
- “left”
- “right”
The parameter applies to a specific defined part “part” of the loading space, so it can be set differently for each defined part.
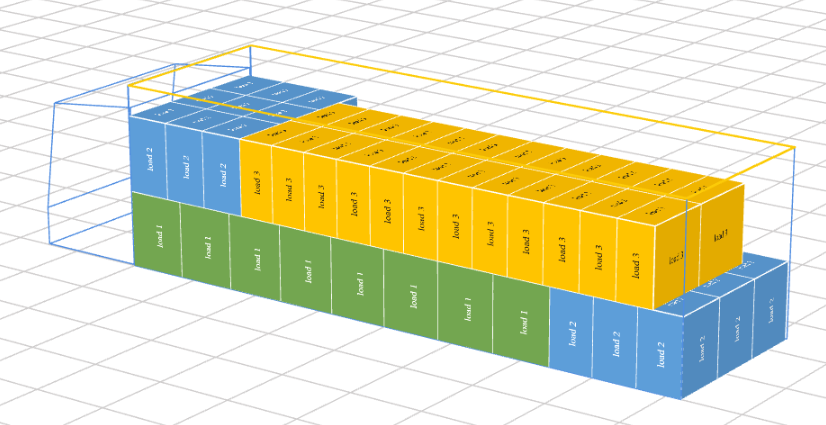
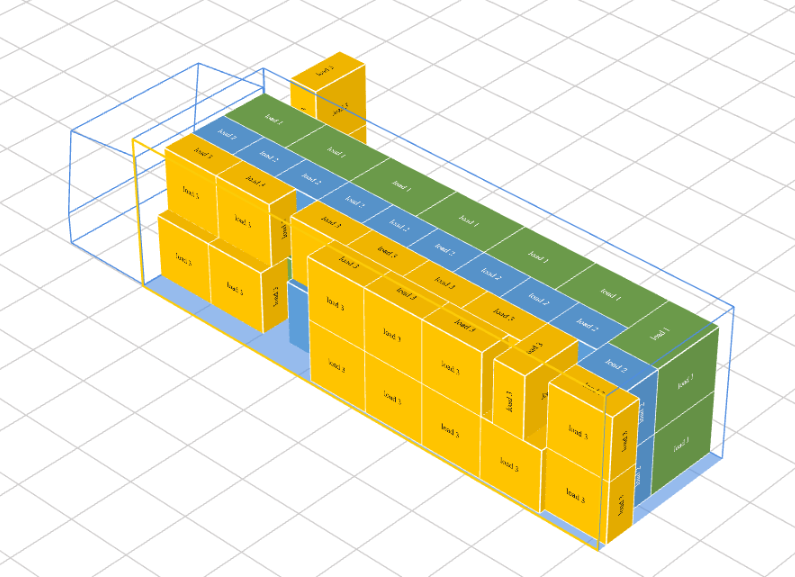
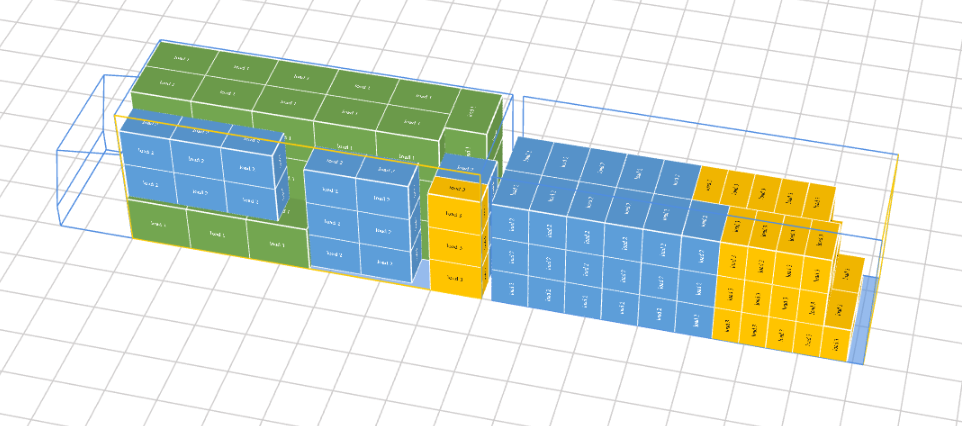
In the drawings, the plane through which loading is meant to take place is highlighted in yellow.
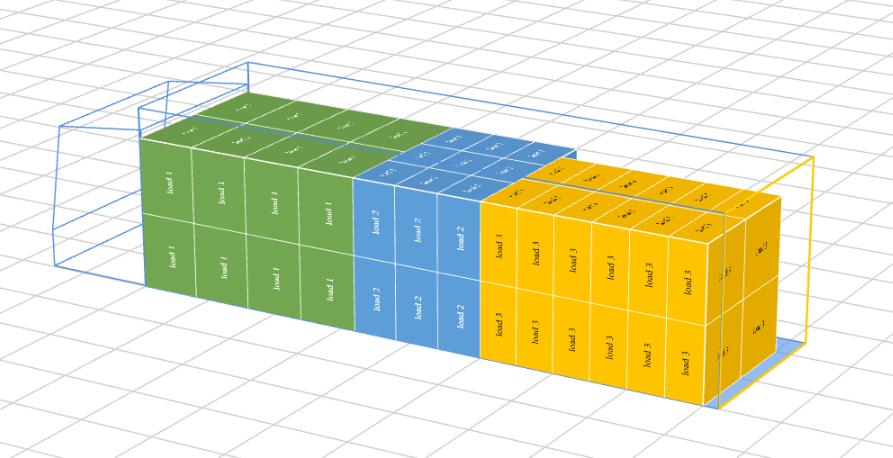
Default loading method “back”
Request:
{
 "loads": [
        {
           "quantity": 16,
           "name": "load 1",
           "color": "#71A34E",
           "length": 120,
           "width": 80,
           "height": 100,
           "weight": 50,
           "stacking": true
        },
         {
           "quantity": 18,
           "name": "load 2",
           "color": "#5B9BD5",
           "length": 80,
           "width": 60,
           "height": 100,
           "weight": 60,
           "stacking": true
        },
        {
           "quantity": 24,
           "name": "load 3",
           "color": "#FFC000",
           "length": 100,
           "width": 50,
           "height": 100,
           "weight": 80,
           "stacking": true
        }
],
        "loadingSpaces": [
         {
            "quantity": 1,
            "name": "Solowka 20 EP",
            "parts": [
                {
                    "length": 820,
                    "width": 245,
                    "height": 240,
                    "limit": 8000,
                    "loadingSide": "back"
                }
            ]
        }
    ],
     "options": {
                }
}
Result:
Loading from the top “top”
Request:
{
 "loads": [
        {
           "quantity": 16,
           "name": "load 1",
           "color": "#71A34E",
           "length": 120,
           "width": 80,
           "height": 100,
           "weight": 50,
           "stacking": true
        },
         {
           "quantity": 18,
           "name": "load 2",
           "color": "#5B9BD5",
           "length": 80,
           "width": 60,
           "height": 100,
           "weight": 60,
           "stacking": true
        },
        {
           "quantity": 24,
           "name": "load 3",
           "color": "#FFC000",
           "length": 100,
           "width": 50,
           "height": 100,
           "weight": 80,
           "stacking": true
        }
],
        "loadingSpaces": [
         {
            "quantity": 1,
            "name": "Solowka 20 EP",
            "parts": [
                {
                    "length": 820,
                    "width": 245,
                    "height": 240,
                    "limit": 8000,
                    "loadingSide": "top"
                }
            ]
        }


    ],
     "options": {
                }
}
Result:
Loading from the left side “left”.
Request:
{
 "loads": [
        {
           "quantity": 16,
           "name": "load 1",
           "color": "#71A34E",
           "length": 120,
           "width": 80,
           "height": 100,
           "weight": 50,
           "stacking": true
        },
         {
           "quantity": 18,
           "name": "load 2",
           "color": "#5B9BD5",
           "length": 80,
           "width": 60,
           "height": 100,
           "weight": 60,
           "stacking": true
        },
        {
           "quantity": 24,
           "name": "load 3",
           "color": "#FFC000",
           "length": 100,
           "width": 50,
           "height": 100,
           "weight": 80,
           "stacking": true
        }
],
        "loadingSpaces": [
         {
            "quantity": 1,
            "name": "Solowka 20 EP",
            "parts": [
                {
                    "length": 820,
                    "width": 245,
                    "height": 240,
                    "limit": 8000,
                    "loadingSide": "left"
                }
            ]
        }


    ],
     "options": {
                }
}
Result:
Loading from the right side “right”.
Request:
{
 "loads": [
        {
           "quantity": 16,
           "name": "load 1",
           "color": "#71A34E",
           "length": 120,
           "width": 80,
           "height": 100,
           "weight": 50,
           "stacking": true
        },
         {
           "quantity": 18,
           "name": "load 2",
           "color": "#5B9BD5",
           "length": 80,
           "width": 60,
           "height": 100,
           "weight": 60,
           "stacking": true
        },
        {
           "quantity": 24,
           "name": "load 3",
           "color": "#FFC000",
           "length": 100,
           "width": 50,
           "height": 100,
           "weight": 80,
           "stacking": true
        }
],
        "loadingSpaces": [
         {
            "quantity": 1,
            "name": "Solowka 20 EP",
            "parts": [
                {
                    "length": 820,
                    "width": 245,
                    "height": 240,
                    "limit": 8000,
                    "loadingSide": "right"
                }
            ]
        }


    ],
     "options": {
                }
}
Result:
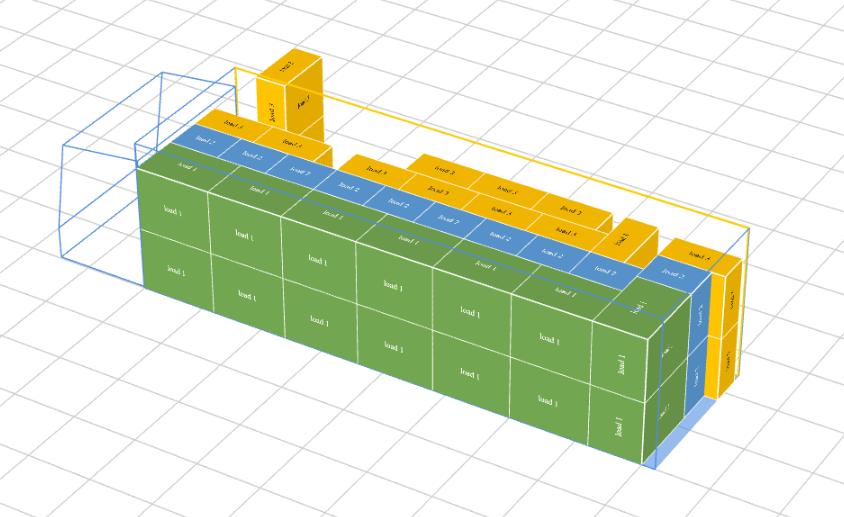
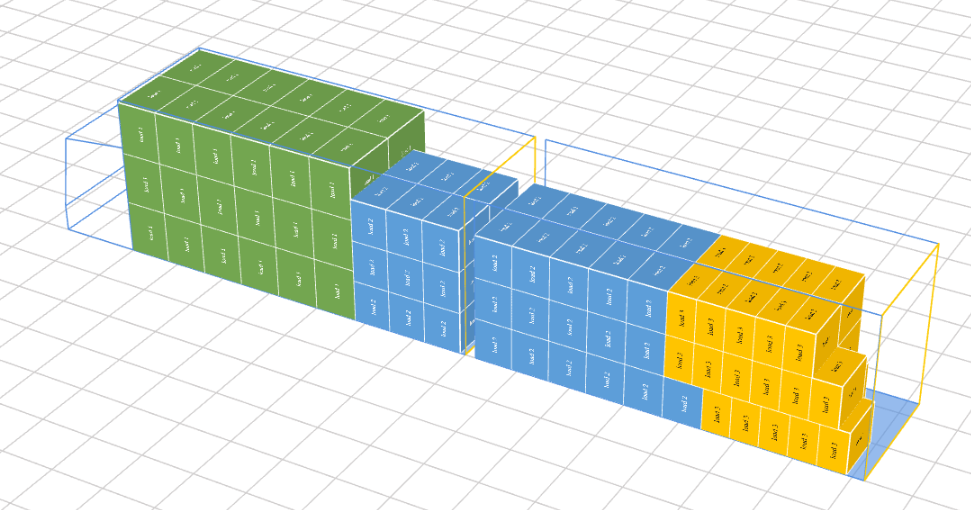
Two parts with different load types – loading a combination unit
Both parts loaded from the rear
Request:
{
 "loads": [
        {
           "quantity": 36,
           "name": "load 1",
           "color": "#71A34E",
           "length": 120,
           "width": 80,
           "height": 100,
           "weight": 100
        },
         {
           "quantity": 50,
           "name": "load 2",
           "color": "#5B9BD5",
           "length": 100,
           "width": 70,
           "height": 80,
           "weight": 80
        },
        {
           "quantity": 30,
           "name": "load 3",
           "color": "#FFC000",
           "length": 100,
           "width": 50,
           "height": 80,
           "weight": 100
        }
],
        "loadingSpaces": [
        {
            "type": "vehicle",
            "quantity": 1,
            "name": "vehicle",
            "parts": [
                {
                    "length": 700,
                    "width": 240,
                    "height": 305,
                    "limit": 6000,
                    "loadingSide": "back"
                },
                {   "length": 700,
                    "width": 240,
                    "height": 305,
                    "limit": 6000,
                    "loadingSide": "back"
                }

            ]
        }
    ],
     "options": {
                }
}
Result:
First part loaded from the left side, second part loaded from the rear
Request:
{
 "loads": [
        {
           "quantity": 36,
           "name": "load 1",
           "color": "#71A34E",
           "length": 120,
           "width": 80,
           "height": 100,
           "weight": 100
        },
         {
           "quantity": 50,
           "name": "load 2",
           "color": "#5B9BD5",
           "length": 100,
           "width": 70,
           "height": 80,
           "weight": 80
        },
        {
           "quantity": 30,
           "name": "load 3",
           "color": "#FFC000",
           "length": 100,
           "width": 50,
           "height": 80,
           "weight": 100
        }
],
        "loadingSpaces": [
        {
            "type": "vehicle",
            "quantity": 1,
            "name": "vehicle",
            "parts": [
                {
                    "length": 700,
                    "width": 240,
                    "height": 305,
                    "limit": 6000,
                    "loadingSide": "left"
                },
                {   "length": 700,
                    "width": 240,
                    "height": 305,
                    "limit": 6000,
                    "loadingSide": "back"
                }

            ]
        }
    ],
     "options": {
                }
}
Result:
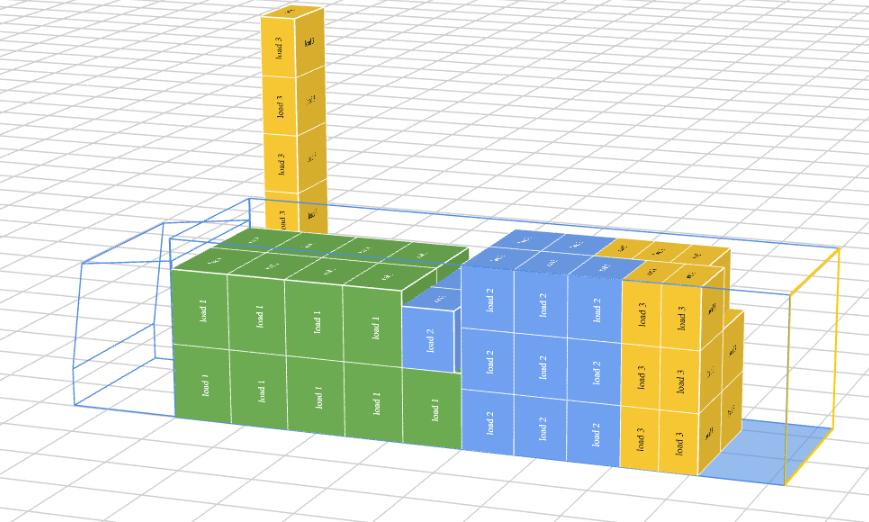
Permissible load capacity of the loading space
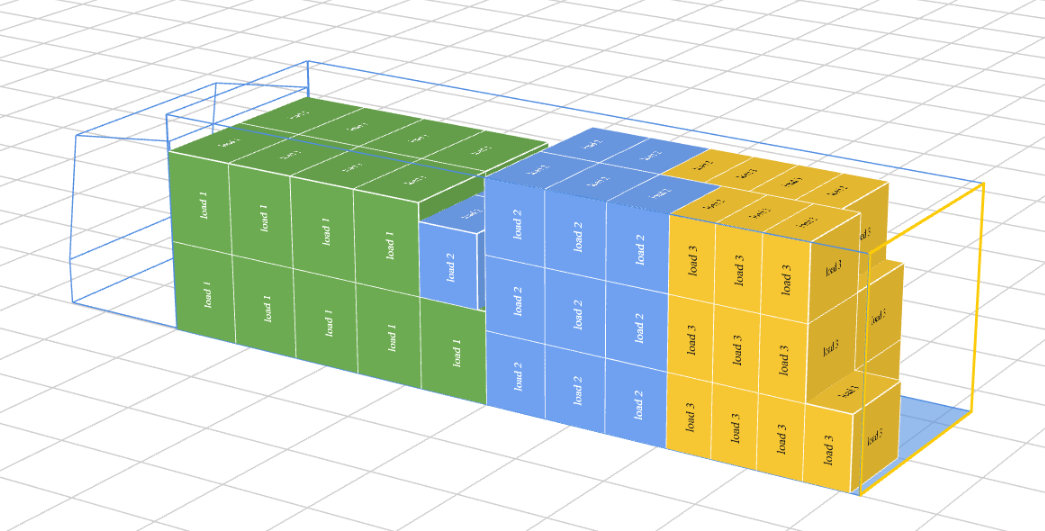
The Goodloading algorithm lets you keep the loaded weight under control. The “allowOverweight” processing parameter governs whether the permissible load capacity of the loading space may be exceeded while cargo is being arranged. The default value, “allowOverweight”: “false”, means the total weight of the cargo cannot exceed the permissible load capacity. Setting the parameter to “true” allows that capacity to be exceeded.
Example 1 – Exceeding the permissible load capacity is not allowed
Request:
{
 "loads": [
        {
           "quantity": 18,
           "name": "load 1",
           "length": 120,
           "width": 80,
           "height": 100,
           "weight": 200
        },
         {
           "quantity": 19,
           "name": "load 2",
           "length": 100,
           "width": 70,
           "height": 80,
           "weight": 160
        },
        {
           "quantity": 20,
           "name": "load 3",
           "length": 100,
           "width": 50,
           "height": 80,
           "weight": 100
        }
],
        "loadingSpaces": [
        {
            "quantity": 1,
            "name": "Solowka 20 EP",
            "parts": [
                {
                    "length": 820,
                    "width": 245,
                    "height": 240,
                    "limit": 8000
                }
            ]
        }
        ],
     "options": {
        "allowOverweight": false
                }
}
Result:
Example 2 – Exceeding the permissible load capacity is allowed
Request
{
 "loads": [
        {
           "quantity": 18,
           "name": "load 1",
           "length": 120,
           "width": 80,
           "height": 100,
           "weight": 200
        },
         {
           "quantity": 19,
           "name": "load 2",
           "length": 100,
           "width": 70,
           "height": 80,
           "weight": 160
        },
        {
           "quantity": 20,
           "name": "load 3",
           "length": 100,
           "width": 50,
           "height": 80,
           "weight": 100
        }
],
        "loadingSpaces": [
        {
            "quantity": 1,
            "name": "Solowka 20 EP",
            "parts": [
                {
                    "length": 820,
                    "width": 245,
                    "height": 240,
                    "limit": 8000
                }
            ]
        }
        ],
     "options": {
        "allowOverweight": true
                }
}
Result
Axle loads
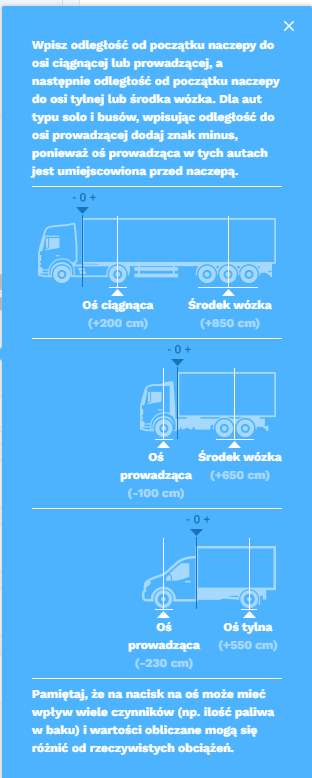
The Goodloading algorithm can control the load on a vehicle’s axles. To do this, an array describing the axles must be defined for each part of the loading space. When such an array is added, it must contain exactly two or three elements (the descriptions of the defined axles).
Example of defining axles for a single part of a loading space:
"axis": [
                        {
                            "distanceFromSpaceFront": -42,
                            "emptySpaceLoad": 2985,
                            "maxLoad": 5300
                        },
                        {
                            "distanceFromSpaceFront": 500,
                            "emptySpaceLoad": 1510,
                            "maxLoad": 10700
                        }
                    ]
where:
| distanceFromSpaceFront | number | Distance of the axle from the front of the loading space; a negative value means the axle sits under the driver’s cab. |
|---|---|---|
| axiemptySpaceLoad | number | Load on the axle when the loading space is empty. The value must be a number greater than or equal to 0. |
| maxLoad | number | Highest permissible load on the axle. The value must be a number greater than or equal to 0. |
Vehicle axle layout diagram
Below are sample, illustrative diagrams for various vehicles.
In response to the request that was sent, we receive a Response containing the axle loads after the cargo has been loaded
"axis": [
                        {
                            "distanceFromSpaceFront": -42,
                            "emptySpaceLoad": 2985,
                            "maxLoad": 5300,
                            "addedLoad": 1428.04
                        },
                        {
                            "distanceFromSpaceFront": 500,
                            "emptySpaceLoad": 1510,
                            "maxLoad": 10700,
                            "addedLoad": 4371.96
                        }
                    ]
where the “addedLoad” parameter indicates the load exerted on the axle by the arranged cargo
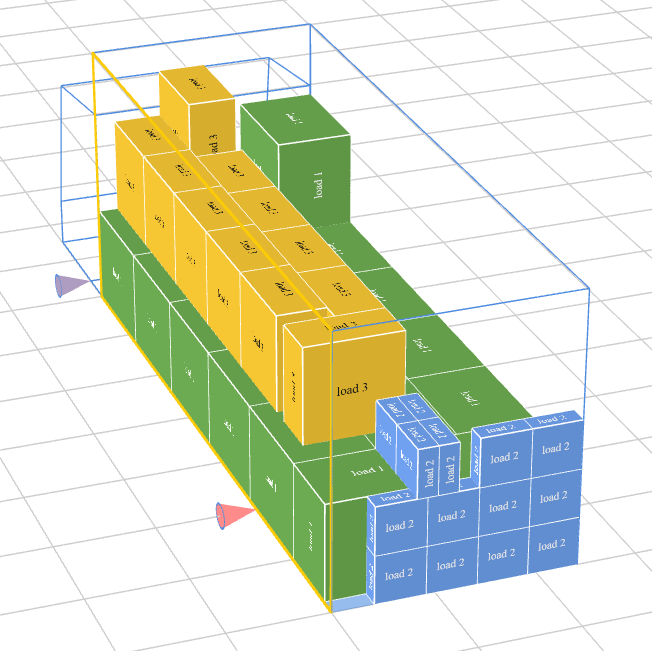
In the visualization of the processing result, the color indicates how heavily the axle is loaded:
- blue – light load
- red – overload
- an intermediate color between blue and red – the degree to which the axle is loaded (but not yet overloaded)
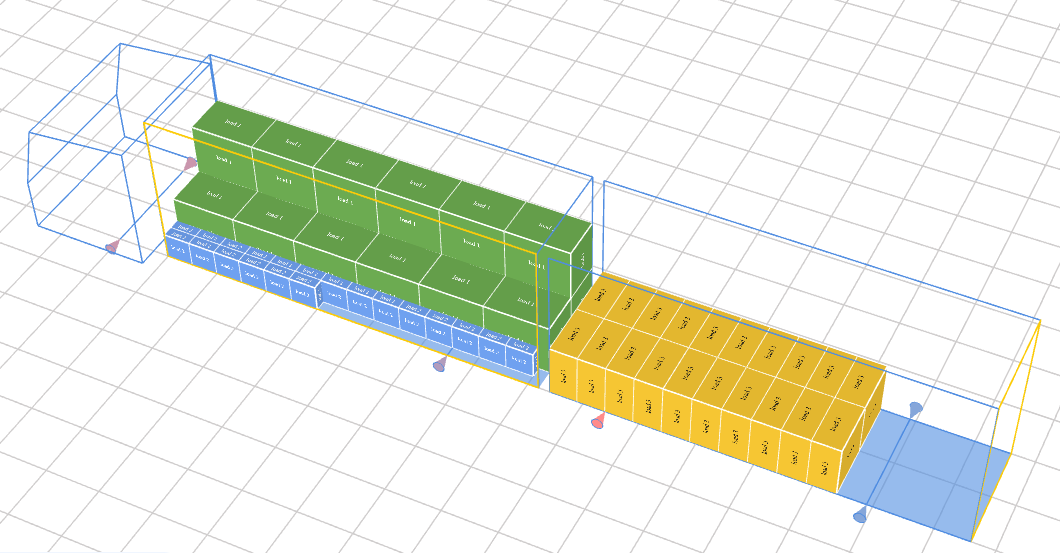
For a combination unit we can specify the axle loads for each part of the vehicle, both the semi-trailer and the trailer. To do this, we must define an array with the parameters of the individual axles for each part of the vehicle.
Example 1 – Rigid truck
Request
{
  "loads": [
        {
           "quantity": 18,
           "name": "load 1",
           "length": 120,
           "width": 80,
           "height": 100,
           "weight": 100,
           "stacking": true,
           "alongFloor": true
        },
         {
           "quantity": 20,
           "name": "load 2",
           "length": 50,
           "width": 20,
           "height": 50,
           "weight": 400,
           "stacking": true,
           "alongFloor": true
        },
        {
           "quantity": 11,
           "name": "load 3",
           "length": 100,
           "width": 50,
           "height": 100,
           "weight": 500,
           "stacking": true,
           "alongFloor": true
        }
],
        "loadingSpaces": [
        {
            "type": "vehicle",
            "quantity": 1,
            "name": "vehicle",
            "parts": [
                {
                    "length": 700,
                    "width": 241.2,
                    "height": 280,
                    "limit": 10505,
                    "loadingSide": "left",
                    "axis": [
                        {
                            "distanceFromSpaceFront": -42,
                            "emptySpaceLoad": 2685,
                            "maxLoad": 5300
                        },
                        {
                            "distanceFromSpaceFront": 500,
                            "emptySpaceLoad": 1310,
                            "maxLoad": 10700
                        }
                    ]
                }
                 ]
        }
        ],
     "options": {
        "allowOverweight": true
                }
}
Result
Axle loads after loading:
   {
                            "distanceFromSpaceFront": -42,
                            "emptySpaceLoad": 2685,
                            "maxLoad": 5300,
                            "addedLoad": 2877.31
                        },
                        {
                            "distanceFromSpaceFront": 500,
                            "emptySpaceLoad": 1310,
                            "maxLoad": 10700,
                            "addedLoad": 12422.69
                        }
                    ]
Example 2 – Combination unit
Request:
{
"loads": [
        {
           "quantity": 18,
           "name": "load 1",
           "length": 120,
           "width": 80,
           "height": 100,
           "weight": 100,
           "stacking": true,
           "alongFloor": true
        },
         {
           "quantity": 20,
           "name": "load 2",
           "length": 50,
           "width": 20,
           "height": 50,
           "weight": 400,
           "stacking": true,
           "alongFloor": true
        },
        {
           "quantity": 20,
           "name": "load 3",
           "length": 100,
           "width": 50,
           "height": 100,
           "weight": 500,
           "stacking": true,
           "alongFloor": true
        }
],
        "loadingSpaces": [
        {
            "type": "vehicle",
            "quantity": 1,
            "name": "zestaw",
            "parts": [
                {
                    "length": 720,
                    "width": 200,
                    "height": 300,
                    "limit": 24000,
                    "loadingSide": "left",
                    "axis": [
                        {
                            "distanceFromSpaceFront": -100,
                            "emptySpaceLoad": 2685,
                            "maxLoad": 5300
                        },
                        {
                            "distanceFromSpaceFront": 550,
                            "emptySpaceLoad": 1310,
                            "maxLoad": 10700
                        }
                    ]
                },
                {   "length": 720,
                    "width": 200,
                    "height": 300,
                    "limit": 24000,
                    "loadingSide": "back",
                    "axis": [
                        {
                            "distanceFromSpaceFront": 100,
                            "emptySpaceLoad": 2685,
                            "maxLoad": 5300
                        },
                        {
                            "distanceFromSpaceFront": 550,
                            "emptySpaceLoad": 1310,
                            "maxLoad": 10700
                        }
                    ]
                }
            ]
        }
    ],
     "options": {
                }
}
Result:
Axle loads after loading:
"axis": [
                        {
                            "distanceFromSpaceFront": -100,
                            "emptySpaceLoad": 2685,
                            "maxLoad": 5300,
                            "addedLoad": 3726.15
                        },
                        {
                            "distanceFromSpaceFront": 550,
                            "emptySpaceLoad": 1310,
                            "maxLoad": 10700,
                            "addedLoad": 6073.85
                        }
                    ]
"axis": [
                        {
                            "distanceFromSpaceFront": 100,
                            "emptySpaceLoad": 2685,
                            "maxLoad": 5300,
                            "addedLoad": 6666.67
                        },
                        {
                            "distanceFromSpaceFront": 550,
                            "emptySpaceLoad": 1310,
                            "maxLoad": 10700,
                            "addedLoad": 3333.33
                        }
                    ]